Sony HDR CX12 Operating Guide - Page 27
Enjoying with a computer, Installing and viewing “Handycam Handbook” (PDF), Installing “PMB” - mac
 |
UPC - 027242732438
View all Sony HDR CX12 manuals
Add to My Manuals
Save this manual to your list of manuals |
Page 27 highlights
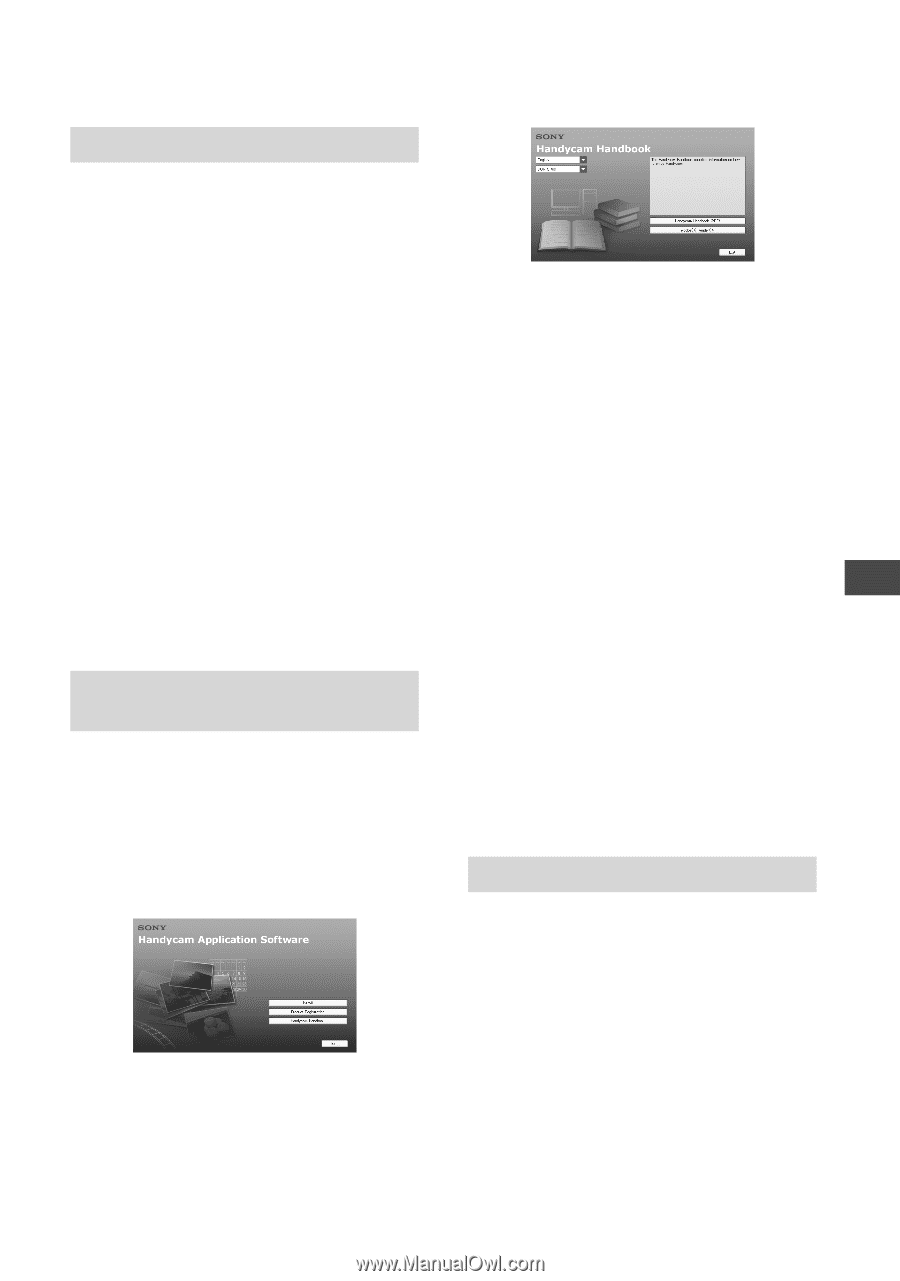
Enjoying with a computer Performing with a computer Enjoying with a computer Handbook/software to be installed "Handycam Handbook" (PDF) "Handycam Handbook" (PDF) explains in detail about your camcorder and its practical use. "PMB" (only for Windows users) "PMB" is the supplied software. You can enjoy the following operations. Creating a disc with one touch operation Importing images to a computer Editing imported images Creating a disc Notes The supplied software "PMB" is not supported by Macintosh computers. To use a Macintosh computer connected to your camcorder, see the following website for details. http://guide.d-imaging.sony.co.jp/mac/ ms/us/ Installing and viewing "Handycam Handbook" (PDF) To view "Handycam Handbook" (PDF), you need to install Adobe Reader on your computer. Turn on the computer. Place the CD-ROM (supplied) in the disc drive of your computer. The select screen for installation appears. Click [Handycam Handbook]. The installation screen for "Handycam Handbook" (PDF) appears. Select the desired language and the model name of your Handycam, then click [Handycam Handbook (PDF)]. Installation starts. When the installation is completed, the short-cut icon of "Handycam Handbook" (PDF) appears on the desktop of your computer. The model name of your Handycam is printed on its bottom surface. Click [Exit] [Exit], then remove the CDROM from the disc drive of your computer. To view "Handycam Handbook" (PDF), double-click the short-cut icon of "Handycam Handbook." Tips For Macintosh users, follow the steps below. Turn on the computer. Place the CD-ROM (supplied) in the disc drive of your computer. Open the [Handbook] folder in the CDROM, double-click the [US] folder and then drag-and-drop the "Handbook.pdf" on the computer. To view "Handycam Handbook," double-click "Handbook. pdf." Installing "PMB" System requirements OS: Microsoft Windows 2000 Professional SP4/Windows XP SP2*/Windows Vista* * 64-bit editions and Starter (Edition) are not supported. Standard installation is required. Operation is not assured if the above OS has been upgraded or in a multi-boot environment. CPU: Intel Pentium 4 2.8 GHz or faster (Intel Pentium 4 3.6 GHz or faster, US 27
-
 1
1 -
2
-
3
-
4
-
5
-
6
-
7
-
8
-
9
-
10
-
11
-
12
-
13
-
14
-
15
-
16
-
17
-
18
-
19
-
20
-
21
-
 22
22 -
 23
23 -
 24
24 -
 25
25 -
 26
26 -
 27
27 -
 28
28 -
 29
29 -
 30
30 -
 31
31 -
 32
32 -
33
-
34
-
35
-
36
-
37
-
38
-
39
-
40
-
41
-
42
-
43
-
44
-
45
-
46
-
47
-
48
-
49
-
50
-
51
-
52
-
53
-
54
-
55
-
56
-
57
-
58
-
59
-
60
-
61
-
62
-
63
-
64
-
65
-
66
-
67
-
68
-
69
-
70
-
71
-
72
 |
 |