Sony HDR FX7 Operating Instructions - Page 22
Step 5: Adjusting the LCD panel and viewfinder, The LCD panel, The viewfinder - best settings
 |
UPC - 027242701946
View all Sony HDR FX7 manuals
Add to My Manuals
Save this manual to your list of manuals |
Page 22 highlights
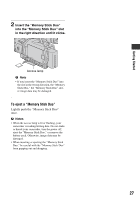
Step 5: Adjusting the LCD panel and viewfinder The LCD panel Open the LCD panel while pressing the OPEN button 90 degrees to the camcorder (1), then rotate it to the best angle to record or play (2). OPEN button 190 degrees to the camcorder 2180 degrees (max.) 290 degrees DISPLAY/BATT INFO (max.) z Tips • If you rotate the LCD panel 180 degrees toward the lens from the position 1, you can close the LCD panel with the LCD screen facing outward. This is convenient during playback operations. • To close the LCD panel with the LCD screen inward, rotate the LCD panel to the position 1, and then close the LCD panel. To turn off the LCD backlight to make the battery last longer Press and hold the DISPLAY/BATT INFO button for a few seconds until appears. This setting is practical when you use your camcorder in bright conditions or where you want to save battery power. The recorded picture will not be affected by the setting. To turn on the LCD backlight, press and hold the DISPLAY/BATT INFO button for a few seconds until disappears. z Tip • See [LCD BRIGHT] (p. 67) to adjust the brightness of the LCD screen. The viewfinder You can view pictures using the viewfinder to save the battery, or when the picture on the LCD screen is not clear. Viewfinder lens adjustment lever Move it until the picture becomes clear. Viewfinder z Tip • You can adjust the brightness of the viewfinder backlight from [VF B.LIGHT] (p. 67). 22
-
 1
1 -
2
-
3
-
4
-
5
-
6
-
7
-
8
-
9
-
10
-
11
-
12
-
13
-
14
-
15
-
16
-
 17
17 -
 18
18 -
 19
19 -
 20
20 -
 21
21 -
 22
22 -
 23
23 -
 24
24 -
 25
25 -
 26
26 -
 27
27 -
28
-
29
-
30
-
31
-
32
-
33
-
34
-
35
-
36
-
37
-
38
-
39
-
40
-
41
-
42
-
43
-
44
-
45
-
46
-
47
-
48
-
49
-
50
-
51
-
52
-
53
-
54
-
55
-
56
-
57
-
58
-
59
-
60
-
61
-
62
-
63
-
64
-
65
-
66
-
67
-
68
-
69
-
70
-
71
-
72
-
73
-
74
-
75
-
76
-
77
-
78
-
79
-
80
-
81
-
82
-
83
-
84
-
85
-
86
-
87
-
88
-
89
-
90
-
91
-
92
-
93
-
94
-
95
-
96
-
97
-
98
-
99
-
100
-
101
-
102
-
103
-
104
-
105
-
106
-
107
-
108
-
109
-
110
-
111
-
112
-
113
-
114
-
115
-
116
-
117
-
118
-
119
-
120
-
121
-
122
-
123
-
124
-
125
-
126
-
127
-
128
-
129
-
130
-
131
 |
 |
