Sony HDR FX7 Operating Instructions - Page 36
To restore automatic adjustment, Adjusting the volume of light, ND filter
 |
UPC - 027242701946
View all Sony HDR FX7 manuals
Add to My Manuals
Save this manual to your list of manuals |
Page 36 highlights
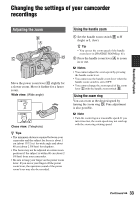
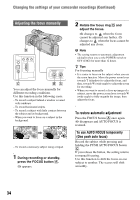
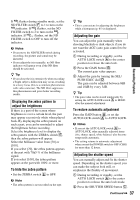
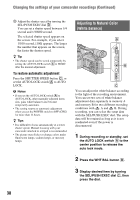
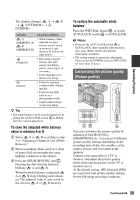
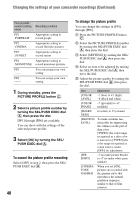
Changing the settings of your camcorder recordings (Continued) z Tips • The range of focus, an important effect of the aperture, is called the depth of field. The depth of field gets shallower as the aperture is opened, and deeper as the aperture is closed. Use the aperture creatively to obtain the desired effect in your photography. • This is handy for making the background blurred or sharp, or when you want to manually adjust the iris, gain or shutter speed on the screen. x AE SHIFT You can slightly adjust the exposure between -7 (dark) and +7 (bright) during the auto recording. appears. +2 b Notes • You cannot manually adjust the IRIS. • [AE SHIFT] does not work when the exposure is manually set or the iris, gain and shutter speed are all set manually. z Tip • You can adjust the AE SHIFT from the menu (p. 61). 1 During recording or standby, set the AUTO LOCK switch A to the center position to release the auto lock mode. This operation is not required when AE SHIFT is assigned to the EXPOSURE/ IRIS dial. 2 Press the EXPOSURE/IRIS button H. The EXPOSURE/IRIS dial G will be effective. 36 3 Adjust the picture quality by turning the EXPOSURE/IRIS dial G. z Tip • If you set the AUTO LOCK switch A to HOLD after manual adjustment, the manually adjusted items are saved. To restore automatic adjustment Press the EXPOSURE/IRIS button H, or set the AUTO LOCK switch A to AUTO LOCK. b Notes • If you set the AUTO LOCK switch A to AUTO LOCK, other manually adjusted items (gain, shutter speed, white balance) also become temporarily automatic. • As you shift the zoom from W (wide) to T (telephoto), the aperture value varies from F1.6 to F2.8. • The setting returns to automatic adjustment (default) when you set the POWER switch to OFF (CHG) for more than 12 hours. z Tips • You can adjust the dial sensitivity of the EXPOSURE/IRIS dial G by selecting [EXPOSURE/IRIS] t [DIAL SENS](p. 59), and the dial operating direction by selecting [EXPOSURE/IRIS] t [DIAL ROTATE] (p. 59). • Settings can also be checked by pressing the STATUS CHECK button (p. 47). • See page 62 for [BACK LIGHT]. Adjusting the volume of light (ND filter) You can record the subject clearly by using the ND filter when the recording environment is too bright. There are 2 levels of ND filter setting. ND filter 1 reduces the volume of light to about 1/4, and ND filter 2 to about 1/16.
-
 1
1 -
2
-
3
-
4
-
5
-
6
-
7
-
8
-
9
-
10
-
11
-
12
-
13
-
14
-
15
-
16
-
17
-
18
-
19
-
20
-
21
-
22
-
23
-
24
-
25
-
26
-
27
-
28
-
29
-
30
-
 31
31 -
 32
32 -
 33
33 -
 34
34 -
 35
35 -
 36
36 -
 37
37 -
 38
38 -
 39
39 -
 40
40 -
 41
41 -
42
-
43
-
44
-
45
-
46
-
47
-
48
-
49
-
50
-
51
-
52
-
53
-
54
-
55
-
56
-
57
-
58
-
59
-
60
-
61
-
62
-
63
-
64
-
65
-
66
-
67
-
68
-
69
-
70
-
71
-
72
-
73
-
74
-
75
-
76
-
77
-
78
-
79
-
80
-
81
-
82
-
83
-
84
-
85
-
86
-
87
-
88
-
89
-
90
-
91
-
92
-
93
-
94
-
95
-
96
-
97
-
98
-
99
-
100
-
101
-
102
-
103
-
104
-
105
-
106
-
107
-
108
-
109
-
110
-
111
-
112
-
113
-
114
-
115
-
116
-
117
-
118
-
119
-
120
-
121
-
122
-
123
-
124
-
125
-
126
-
127
-
128
-
129
-
130
-
131
 |
 |
