Sony HDR FX7 Operating Instructions - Page 40
To cancel the picture profile recording, To change the picture profile - parts
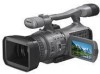 |
UPC - 027242701946
View all Sony HDR FX7 manuals
Add to My Manuals
Save this manual to your list of manuals |
Page 40 highlights
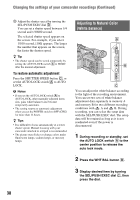
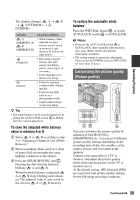
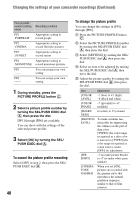
Changing the settings of your camcorder recordings (Continued) Picture profile number (setting name) PP1 :PORTRAIT PP2 :CINEMA PP3 :SUNSET PP4 :MONOTONE PP5 :------ PP6 :------ Recording condition Appropriate setting to record people Appropriate setting to record film-like pictures Appropriate setting to record sunset Appropriate setting to record monotone pictures You can assign your own setting You can assign your own setting. 1 During standby, press the PICTURE PROFILE button C. 2 Select a picture profile number by turning the SEL/PUSH EXEC dial A, then press the dial. [PP1] through [PP6] are available. You can shoot with the settings of the selected picture profile. 3 Select [OK] by turning the SEL/ PUSH EXEC dial A. To cancel the picture profile recording Select [OFF] in step 2, then press the SEL/ PUSH EXEC dial A. 40 To change the picture profile You can change the settings in [PP1] through [PP6]. 1 Press the PICTURE PROFILE button C. 2 Select the PICTURE PROFILE number by turning the SEL/PUSH EXEC dial A, then press the dial. 3 Select [SETTING] by turning the SEL/ PUSH EXEC dial A, then press the dial. 4 Select an item to be adjusted by turning the SEL/PUSH EXEC dial A, then press the dial. 5 Adjust the picture quality by turning the SEL/PUSH EXEC dial A, then press the dial. Item Adjustment [COLOR -7 (low) to +7 (high) LEVEL] -8 (black and white) [COLOR -7 (greenish) to +7 PHASE] (reddish) [SHARP- 0 (softer) to 15 (clearer) NESS] [SKINTON E DTL] To make wrinkles less noticeable by suppressing the outlines on the part of skin color. [TYPE1] (the color range recognized as a skin color is narrow) to [TYPE3] (the color range recognized as a skin color is wide) [OFF]: no adjustment [WB SHIFT] -7 (to make picture bluish) to +7 (to make white parts reddish) [CINEMATONE GAMMA] When you set [ON], pictures are recorded with the gamma curve that reproduces the natural gradation sequence, similar to that of film cameras
-
 1
1 -
2
-
3
-
4
-
5
-
6
-
7
-
8
-
9
-
10
-
11
-
12
-
13
-
14
-
15
-
16
-
17
-
18
-
19
-
20
-
21
-
22
-
23
-
24
-
25
-
26
-
27
-
28
-
29
-
30
-
31
-
32
-
33
-
34
-
 35
35 -
 36
36 -
 37
37 -
 38
38 -
 39
39 -
 40
40 -
 41
41 -
 42
42 -
 43
43 -
 44
44 -
 45
45 -
46
-
47
-
48
-
49
-
50
-
51
-
52
-
53
-
54
-
55
-
56
-
57
-
58
-
59
-
60
-
61
-
62
-
63
-
64
-
65
-
66
-
67
-
68
-
69
-
70
-
71
-
72
-
73
-
74
-
75
-
76
-
77
-
78
-
79
-
80
-
81
-
82
-
83
-
84
-
85
-
86
-
87
-
88
-
89
-
90
-
91
-
92
-
93
-
94
-
95
-
96
-
97
-
98
-
99
-
100
-
101
-
102
-
103
-
104
-
105
-
106
-
107
-
108
-
109
-
110
-
111
-
112
-
113
-
114
-
115
-
116
-
117
-
118
-
119
-
120
-
121
-
122
-
123
-
124
-
125
-
126
-
127
-
128
-
129
-
130
-
131
 |
 |
