Sony HDR FX7 Operating Instructions - Page 41
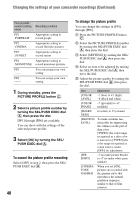
To check the picture profile settings, To name the picture profile settings, To copy the picture
 |
UPC - 027242701946
View all Sony HDR FX7 manuals
Add to My Manuals
Save this manual to your list of manuals |
Page 41 highlights
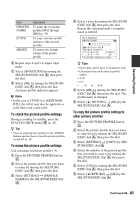
Item [PROFILE NAME] [COPY] [RESET] Adjustment To name the set picture profiles [PP1] through [PP6] (p. 39) To copy a picture profile setting to other picture profiles To restore the default setting of the picture profile 6 Repeat steps 4 and 5 to adjust other items. 7 Select [ RETURN] by turning the SEL/PUSH EXEC dial A, then press the dial. 8 Select [OK] by turning the SEL/PUSH EXEC dial A, then press the dial. A picture profile indicator appears. b Note • In the case of [TYPE3] of [SKINTONE DTL], the effect may also be applied to a color that is not a skin color. To check the picture profile settings During recording or standby, press the STATUS CHECK button B (p. 47). z Tip • You can assign picture profiles to the ASSIGN buttons and use them to turn the picture profiles on and off (p. 42). To name the picture profile settings You can name on picture profile 1~6. 1 Press the PICTURE PROFILE button C. 2 Select the picture profile that you want to name by turning the SEL/PUSH EXEC dial A, then press the dial. 3 Select [SETTING] t [PROFILE NAME] by the SEL/PUSH EXEC dial A. 4 Select a letter by turning the SEL/PUSH EXEC dial A, then press the dial. Repeat this operation until a complete name is entered. PICT. PROFILE P I CTURE PROF I LE CANCEL OK END z Tips • Each name can be up to 12 characters long. • Characters that can be used in profile names: • A~Z • 0~9 5 Select [OK] by turning the SEL/PUSH EXEC dial A, then press the dial. The profile name is changed. 6 Select [ RETURN] t [OK] by the SEL/PUSH EXEC dial A. To copy the picture profile setting to other picture profiles 1 Press the PICTURE PROFILE button C. 2 Select the picture profile that you want to copy from by turning the SEL/PUSH EXEC dial A, then press the dial. 3 Select [SETTING] t [COPY] by SEL/ PUSH EXEC dial A. 4 Select the number of the picture profile that you want to copy to by turning the SEL/PUSH EXEC dial A, then press the dial. 5 Select [YES] by turning the SEL/PUSH EXEC dial A, then press the dial. 6 Select [ RETURN] t [OK] by the SEL/PUSH EXEC dial A. Continued , 41 Recording/Playback
-
 1
1 -
2
-
3
-
4
-
5
-
6
-
7
-
8
-
9
-
10
-
11
-
12
-
13
-
14
-
15
-
16
-
17
-
18
-
19
-
20
-
21
-
22
-
23
-
24
-
25
-
26
-
27
-
28
-
29
-
30
-
31
-
32
-
33
-
34
-
35
-
 36
36 -
 37
37 -
 38
38 -
 39
39 -
 40
40 -
 41
41 -
 42
42 -
 43
43 -
 44
44 -
 45
45 -
 46
46 -
47
-
48
-
49
-
50
-
51
-
52
-
53
-
54
-
55
-
56
-
57
-
58
-
59
-
60
-
61
-
62
-
63
-
64
-
65
-
66
-
67
-
68
-
69
-
70
-
71
-
72
-
73
-
74
-
75
-
76
-
77
-
78
-
79
-
80
-
81
-
82
-
83
-
84
-
85
-
86
-
87
-
88
-
89
-
90
-
91
-
92
-
93
-
94
-
95
-
96
-
97
-
98
-
99
-
100
-
101
-
102
-
103
-
104
-
105
-
106
-
107
-
108
-
109
-
110
-
111
-
112
-
113
-
114
-
115
-
116
-
117
-
118
-
119
-
120
-
121
-
122
-
123
-
124
-
125
-
126
-
127
-
128
-
129
-
130
-
131
 |
 |
