Sony HDR FX7 Operating Instructions - Page 83
Printing recorded images (PictBridge compliant printer), PictBridge, compliant printer
 |
UPC - 027242701946
View all Sony HDR FX7 manuals
Add to My Manuals
Save this manual to your list of manuals |
Page 83 highlights
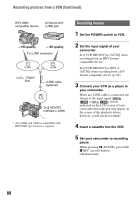
b Note • Pictures cannot be deleted when a "Memory Stick Duo" with the write-protect tab is set to the write-protect position (p. 107), or when the selected picture is protected (p. 94). z Tips • To delete images from the index screen, use the VOLUME/MEMORY button to move the B mark to the images you want to and perform steps 3 and 4. • To delete all pictures at once, select [ ALL ERASE] (p. 72). Printing recorded images (PictBridge compliant printer) You can print out pictures using a PictBridge compliant printer without connecting the camcorder to a computer. Connect the AC Adaptor to your camcorder to obtain power from the wall outlet. Insert the "Memory Stick Duo", containing still images into your camcorder and turn on the printer. Connecting your camcorder to the printer 1 Set the POWER switch to VCR. 2 Press the MENU button, and select (OTHERS) menu t [USB SELECT] t [PictBridge PRINT] with the SEL/PUSH EXEC dial. 3 Connect the USB cable to the (USB) jacks of your camcorder and the printer. USB cable (supplied) Dubbing/Editing Continued , 83
-
 1
1 -
2
-
3
-
4
-
5
-
6
-
7
-
8
-
9
-
10
-
11
-
12
-
13
-
14
-
15
-
16
-
17
-
18
-
19
-
20
-
21
-
22
-
23
-
24
-
25
-
26
-
27
-
28
-
29
-
30
-
31
-
32
-
33
-
34
-
35
-
36
-
37
-
38
-
39
-
40
-
41
-
42
-
43
-
44
-
45
-
46
-
47
-
48
-
49
-
50
-
51
-
52
-
53
-
54
-
55
-
56
-
57
-
58
-
59
-
60
-
61
-
62
-
63
-
64
-
65
-
66
-
67
-
68
-
69
-
70
-
71
-
72
-
73
-
74
-
75
-
76
-
77
-
 78
78 -
 79
79 -
 80
80 -
 81
81 -
 82
82 -
 83
83 -
 84
84 -
 85
85 -
 86
86 -
 87
87 -
 88
88 -
89
-
90
-
91
-
92
-
93
-
94
-
95
-
96
-
97
-
98
-
99
-
100
-
101
-
102
-
103
-
104
-
105
-
106
-
107
-
108
-
109
-
110
-
111
-
112
-
113
-
114
-
115
-
116
-
117
-
118
-
119
-
120
-
121
-
122
-
123
-
124
-
125
-
126
-
127
-
128
-
129
-
130
-
131
 |
 |
