Sony ICD-UX560 Help Guide Printable PDF - Page 42
Help Guide | Charging the battery with the USB AC adaptor
 |
View all Sony ICD-UX560 manuals
Add to My Manuals
Save this manual to your list of manuals |
Page 42 highlights
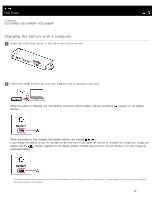
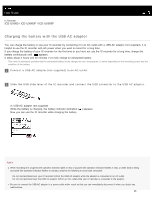
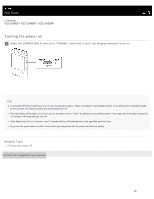
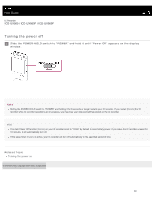
Help Guide IC Recorder ICD-UX560 / ICD-UX560F / ICD-UX565F Charging the battery with the USB AC adaptor You can charge the battery or use your IC recorder by connecting it to an AC outlet with a USB AC adaptor (not supplied). It is helpful to use the IC recorder with AC power when you want to record for a long time. If you charge the battery of your IC recorder for the first time or you have not use the IC recorder for a long time, charge the battery continuously until appears. It takes about 2 hours and 30 minutes (*) to fully charge an exhausted battery. * This value is estimated, provided that the exhausted battery is fully charged at room temperature. It varies depending on the remaining power and the condition of the battery. 1 Connect a USB AC adaptor (not supplied) to an AC outlet. 2 Slide the USB slide lever of the IC recorder and connect the USB connector to the USB AC adaptor. A: USB AC adaptor (not supplied) While the battery is charging, the battery indicator animation ( ) appears. Now you can use the IC recorder while charging the battery. Note While recording is in progress (the operation indicator lights in red) or paused (the operation indicator flashes in red), or while data is being accessed (the operation indicator flashes in orange), observe the following to avoid data corruption: Do not connect/disconnect your IC recorder to/from the USB AC adaptor while the adaptor is connected to an AC outlet. Do not connect/disconnect the USB AC adaptor to/from an AC outlet while your IC recorder is connected to the adaptor. Be sure to connect the USB AC adaptor to a power outlet within reach so that you can immediately disconnect it when you detect any malfunctions. 26
-
 1
1 -
2
-
3
-
4
-
5
-
6
-
7
-
8
-
9
-
10
-
11
-
12
-
13
-
14
-
15
-
16
-
17
-
18
-
19
-
20
-
21
-
22
-
23
-
24
-
25
-
26
-
27
-
28
-
29
-
30
-
31
-
32
-
33
-
34
-
35
-
36
-
 37
37 -
 38
38 -
 39
39 -
 40
40 -
 41
41 -
 42
42 -
 43
43 -
 44
44 -
 45
45 -
 46
46 -
 47
47 -
48
-
49
-
50
-
51
-
52
-
53
-
54
-
55
-
56
-
57
-
58
-
59
-
60
-
61
-
62
-
63
-
64
-
65
-
66
-
67
-
68
-
69
-
70
-
71
-
72
-
73
-
74
-
75
-
76
-
77
-
78
-
79
-
80
-
81
-
82
-
83
-
84
-
85
-
86
-
87
-
88
-
89
-
90
-
91
-
92
-
93
-
94
-
95
-
96
-
97
-
98
-
99
-
100
-
101
-
102
-
103
-
104
-
105
-
106
-
107
-
108
-
109
-
110
-
111
-
112
-
113
-
114
-
115
-
116
-
117
-
118
-
119
-
120
-
121
-
122
-
123
-
124
-
125
-
126
-
127
-
128
-
129
-
130
-
131
-
132
-
133
-
134
-
135
-
136
-
137
-
138
-
139
-
140
-
141
-
142
-
143
-
144
-
145
-
146
-
147
-
148
-
149
-
150
-
151
-
152
-
153
-
154
-
155
-
156
-
157
-
158
-
159
-
160
-
161
-
162
-
163
-
164
-
165
-
166
-
167
-
168
-
169
-
170
-
171
-
172
-
173
-
174
-
175
-
176
-
177
-
178
-
179
-
180
-
181
-
182
-
183
-
184
-
185
-
186
-
187
-
188
-
189
-
190
-
191
-
192
-
193
-
194
-
195
-
196
-
197
-
198
-
199
-
200
-
201
-
202
-
203
-
204
-
205
-
206
-
207
-
208
-
209
-
210
-
211
-
212
-
213
-
214
-
215
-
216
-
217
-
218
-
219
-
220
-
221
-
222
-
223
-
224
-
225
-
226
-
227
-
228
-
229
-
230
-
231
-
232
-
233
-
234
-
235
-
236
-
237
-
238
-
239
-
240
-
241
-
242
-
243
-
244
-
245
-
246
-
247
-
248
-
249
-
250
-
251
-
252
-
253
-
254
-
255
-
256
-
257
-
258
-
259
-
260
-
261
-
262
-
263
-
264
-
265
-
266
-
267
-
268
-
269
 |
 |