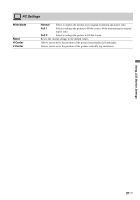
Sony KLV-40ZX1M Operating Instructions - Page 23
LCD Monitor., When installing the Speaker System - fix
 |
UPC - 027242748101
View all Sony KLV-40ZX1M manuals
Add to My Manuals
Save this manual to your list of manuals |
Page 23 highlights
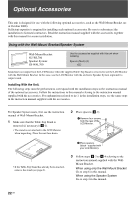
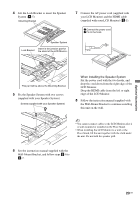
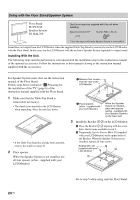
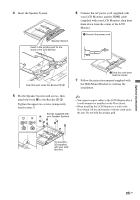
Optional Accessories 4 Lift the Lock Bracket to insert the Speaker System (4-5). Mounting Bracket 7 Connect the AC power cord (supplied with your LCD Monitor) and the HDMI cable (supplied with your LCD Monitor) (5-1). 1 Connect the power cord. 2 Fix to the hook. Speaker System Insert in the junction part for Lock Bracket the stand of the LCD Monitor. This part will be above the Mounting Bracket. 5 Fix the Speaker System with two screws (supplied with your Speaker System). Screws (supplied with your Speaker System) When installing the Speaker System Fix the power cord with the two hooks, and drop the cord down from the right edge of the LCD Monitor. Drop the HDMI cable from the left or right edge of the LCD Monitor. 8 Follow the instruction manual supplied with the Wall-Mount Bracket to continue installing this unit on the wall. ~ • You cannot connect cables to the LCD Monitor after it is wall-mounted or installed on the Floor Stand. • When installing the LCD Monitor to a wall or the Floor Stand, lift the unit together with the cloth under the unit. Do not hold the speaker grill. 6 See the instruction manual supplied with the Wall-Mount Bracket, and follow steps 4-6 to 4-7. 23 US
-
 1
1 -
2
-
3
-
4
-
5
-
6
-
7
-
8
-
9
-
10
-
11
-
12
-
13
-
14
-
15
-
16
-
17
-
 18
18 -
 19
19 -
 20
20 -
 21
21 -
 22
22 -
 23
23 -
 24
24 -
 25
25 -
 26
26 -
 27
27 -
 28
28 -
29
-
30
-
31
-
32
-
33
-
34
-
35
-
36
-
37
-
38
-
39
-
40
-
41
-
42
-
43
-
44
-
45
-
46
-
47
-
48
-
49
-
50
-
51
-
52
-
53
-
54
-
55
-
56
-
57
-
58
-
59
-
60
-
61
-
62
-
63
-
64
-
65
-
66
-
67
-
68
-
69
-
70
-
71
-
72
-
73
-
74
-
75
-
76
-
77
-
78
-
79
-
80
-
81
-
82
-
83
-
84
-
85
-
86
-
87
 |
 |
