Sony KLV-40ZX1M Operating Instructions - Page 26
Other Information, Troubleshooting - settings
 |
UPC - 027242748101
View all Sony KLV-40ZX1M manuals
Add to My Manuals
Save this manual to your list of manuals |
Page 26 highlights
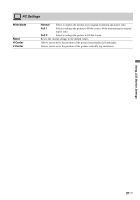
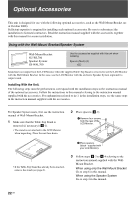
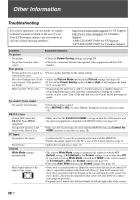
Other Information Troubleshooting If you have questions, service needs, or require technical assistance related to the use of your Sony LCD monitor, please visit our website or call one of the following numbers: http://www.sony.com/tvsupport for US Support http://www.sony.ca/support for Canadian Support 1-800-222-SONY(7669) for US Support 1-877-899-SONY(7669) for Canadian Support Condition Explanation/Solution No picture No picture • Check the Power Saving settings (see page 20). No picture from the video source • Check the connection between the optional video equipment and the LCD monitor. Poor picture Picture quality not as good as • Picture quality depends on the signal content. viewed at the store No color / Dark picture / Color • Adjust the Picture Mode options in the Picture settings (see page 16). is not correct / The picture is • If you set the Power Saving mode to Low or High, it will enhance the black too bright level (see page 20). Blurry picture / Poor color • Transporting the unit from a cold to a warm location or a sudden change in room temperature may cause moisture condensation, resulting in a blurry picture or poor color. Turn off the unit and wait a few hours before powering on again. No sound / Noisy sound No sound / Good picture • Check the volume control. • Press MUTING or VOL + so that "Muting" disappears from the screen (see page 14). BRAVIA Sync Cannot find connected BRAVIA Sync HDMI equipment • Make sure that the Control for HDMI is set up on both the LCD monitor and the optional equipment compatible with BRAVIA Sync (see page 12). Second A/V receiver is not listed on the Device List • Only one A/V receiver may be used with the BRAVIA Sync and Control for HDMI functions at one time (see page 20). PC Input No picture / No signal • Confirm the PC is correctly connected to the unit with the HDMI IN. • Ensure the output signal from the PC is one of the formats listed on page 11. Poor Picture • Adjust the resolution (see page 11). General Wide Mode changes automatically • The current Wide Mode setting is automatically replaced with the 4:3 Default setting, if 4:3 Default in the Screen settings is set to other than Off. If you want to lock in Wide Mode selected with WIDE on the remote control, set 4:3 Default to Off in the Screen settings (see page 19). • Check the Auto Wide option in the Screen settings (see page 19). Black bands appear at the edges of the screen • Some wide screen programs are filmed in aspect ratios that are greater than 16:9 (this is especially common with theatrical releases). Your LCD monitor will show these programs with black bands at the top and bottom of the screen. For more details, check the documentation that came with your DVD (or contact your program provider). • Programs in 4:3 aspect ratio will have bands on left and right sides of the screen. 26 US
-
 1
1 -
2
-
3
-
4
-
5
-
6
-
7
-
8
-
9
-
10
-
11
-
12
-
13
-
14
-
15
-
16
-
17
-
18
-
19
-
20
-
 21
21 -
 22
22 -
 23
23 -
 24
24 -
 25
25 -
 26
26 -
 27
27 -
 28
28 -
 29
29 -
 30
30 -
 31
31 -
32
-
33
-
34
-
35
-
36
-
37
-
38
-
39
-
40
-
41
-
42
-
43
-
44
-
45
-
46
-
47
-
48
-
49
-
50
-
51
-
52
-
53
-
54
-
55
-
56
-
57
-
58
-
59
-
60
-
61
-
62
-
63
-
64
-
65
-
66
-
67
-
68
-
69
-
70
-
71
-
72
-
73
-
74
-
75
-
76
-
77
-
78
-
79
-
80
-
81
-
82
-
83
-
84
-
85
-
86
-
87
 |
 |