Sony KLV-40ZX1M Operating Instructions - Page 25
Insert the Speaker System., your LCD Monitor and the HDMI cable
 |
UPC - 027242748101
View all Sony KLV-40ZX1M manuals
Add to My Manuals
Save this manual to your list of manuals |
Page 25 highlights
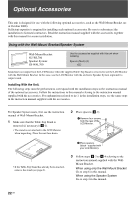
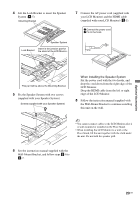
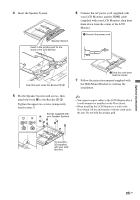
4 Insert the Speaker System. Speaker System Insert in the junction part for the stand of the LCD Monitor. 6 Connect the AC power cord (supplied with your LCD Monitor) and the HDMI cable (supplied with your LCD Monitor), then drop them down from the center of the LCD Monitor. 1 Connect the power cord. Insert this part under the Bracket I J. 5 Fix the Speaker System with screws, then attach the hook M to the Bracket I J. Tighten the upper two screws (temporarily fixed in step 3). Screws (supplied with O your Speaker System) M 2 Drop the cord down from the center. 7 Follow the instruction manual supplied with the Wall-Mount Bracket to continue the installation. ~ • You cannot connect cables to the LCD Monitor after it is wall-mounted or installed on the Floor Stand. • When installing the LCD Monitor to a wall or the Floor Stand, lift the unit together with the cloth under the unit. Do not hold the speaker grill. Screws M6 × 20 (supplied with your LCD Monitor) Optional Accessories 25 US
-
 1
1 -
2
-
3
-
4
-
5
-
6
-
7
-
8
-
9
-
10
-
11
-
12
-
13
-
14
-
15
-
16
-
17
-
18
-
19
-
 20
20 -
 21
21 -
 22
22 -
 23
23 -
 24
24 -
 25
25 -
 26
26 -
 27
27 -
 28
28 -
 29
29 -
 30
30 -
31
-
32
-
33
-
34
-
35
-
36
-
37
-
38
-
39
-
40
-
41
-
42
-
43
-
44
-
45
-
46
-
47
-
48
-
49
-
50
-
51
-
52
-
53
-
54
-
55
-
56
-
57
-
58
-
59
-
60
-
61
-
62
-
63
-
64
-
65
-
66
-
67
-
68
-
69
-
70
-
71
-
72
-
73
-
74
-
75
-
76
-
77
-
78
-
79
-
80
-
81
-
82
-
83
-
84
-
85
-
86
-
87
 |
 |
