Sony PCV-RX640 Computer User Guide (primary manual) - Page 51
Recording from a CD
 |
View all Sony PCV-RX640 manuals
Add to My Manuals
Save this manual to your list of manuals |
Page 51 highlights
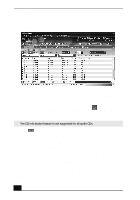
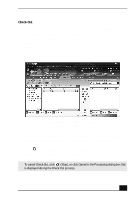
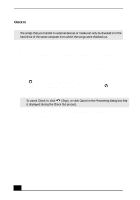
SonicStage Software 1 Feature tabs 5 Tutorial Changes the screen view according to the selected feature. Click to open or close the Tutorial feature. 2 Player control buttons 6 Internet address drop-down list Controls playback functions, such as play, pause, stop, fast forward, Displays current and recently visited Internet addresses. Click the and reverse. You can increase or "Go to URL link" button to decrease volume and switch view modes. immediately connect to your favorite Web sites. 3 Playlist drop-down list 7 File list view (Playlist view) (Playlist view) Displays the contents of the folder Displays available playlists and audio files. selected in the file tree view. 4 File tree view (Playlist view) Displays the folders available on your computer, enabling you to locate your audio files. Expand the views for the file list or Playlist drop-down using the Playlist switch button. Recording from a CD You can record songs from audio CDs and import them to playlists in SonicStage. ✍ When you record from an audio CD from your optical disc drive for the first time, the "CD Drive Optimization" dialog box appears. Click Start to verify your optical disc drive. After the verification is performed, recording begins. 1 Insert an audio CD into your system's optical disc drive. 2 Click the CD tab. 3 Use the drop-down lists to select the ATRAC3 bit rate, CD drive, and Record To destination. 53
-
 1
1 -
2
-
3
-
4
-
5
-
6
-
7
-
8
-
9
-
10
-
11
-
12
-
13
-
14
-
15
-
16
-
17
-
18
-
19
-
20
-
21
-
22
-
23
-
24
-
25
-
26
-
27
-
28
-
29
-
30
-
31
-
32
-
33
-
34
-
35
-
36
-
37
-
38
-
39
-
40
-
41
-
42
-
43
-
44
-
45
-
 46
46 -
 47
47 -
 48
48 -
 49
49 -
 50
50 -
 51
51 -
 52
52 -
 53
53 -
 54
54 -
 55
55 -
 56
56 -
57
-
58
-
59
-
60
-
61
-
62
-
63
-
64
-
65
-
66
-
67
-
68
-
69
-
70
-
71
-
72
-
73
-
74
-
75
-
76
-
77
-
78
-
79
-
80
-
81
-
82
-
83
-
84
-
85
-
86
-
87
-
88
-
89
-
90
-
91
-
92
-
93
-
94
 |
 |
