Sony PCV-RX640 Computer User Guide (primary manual) - Page 52
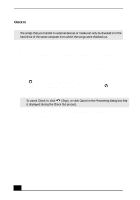
Transferring songs Check-In/Check-Out
 |
View all Sony PCV-RX640 manuals
Add to My Manuals
Save this manual to your list of manuals |
Page 52 highlights
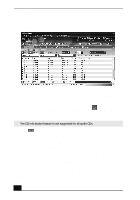
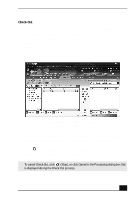
VAIO Digital Studio Computer User Guide CD tab window 4 You can identify specific tracks on your CD by clearing the check marks from the tracks you don't want to record. You can clear all selected tracks by selecting the empty checkbox next to Select All, and then selecting the tracks you want to record. If your Internet connection is active, you can use the view the name of your CD and its song titles. CD Info button to ✍ The CD Info button feature is not supported for all audio CDs. 5 Click (Rec to Jukebox) to begin recording. When the recording is finished, the new playlist appears in the File tree view of the Playlist window. Transferring songs (Check-In/Check-Out) You can transfer songs between the playlists in the SonicStage software and external devices or media. For more information on using your external devices or media, see the instructions supplied with the device or media. These instructions are for using the Check-In/Check-Out "1-step" method. For information on using another method, see "Changing the check-in/check-out settings" in the SonicStage online Help file. 54
-
 1
1 -
2
-
3
-
4
-
5
-
6
-
7
-
8
-
9
-
10
-
11
-
12
-
13
-
14
-
15
-
16
-
17
-
18
-
19
-
20
-
21
-
22
-
23
-
24
-
25
-
26
-
27
-
28
-
29
-
30
-
31
-
32
-
33
-
34
-
35
-
36
-
37
-
38
-
39
-
40
-
41
-
42
-
43
-
44
-
45
-
46
-
 47
47 -
 48
48 -
 49
49 -
 50
50 -
 51
51 -
 52
52 -
 53
53 -
 54
54 -
 55
55 -
 56
56 -
 57
57 -
58
-
59
-
60
-
61
-
62
-
63
-
64
-
65
-
66
-
67
-
68
-
69
-
70
-
71
-
72
-
73
-
74
-
75
-
76
-
77
-
78
-
79
-
80
-
81
-
82
-
83
-
84
-
85
-
86
-
87
-
88
-
89
-
90
-
91
-
92
-
93
-
94
 |
 |
