Sony RDR-GX360 Operating Instructions - Page 73
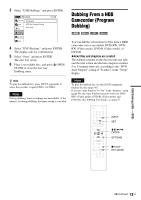
Dubbing From a HDD Camcorder (Program Dubbing), How titles and s are created
 |
UPC - 027242735507
View all Sony RDR-GX360 manuals
Add to My Manuals
Save this manual to your list of manuals |
Page 73 highlights
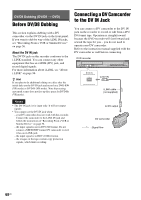
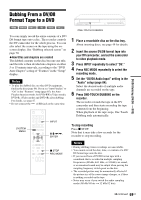
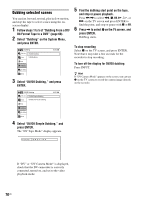
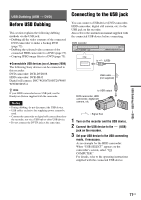
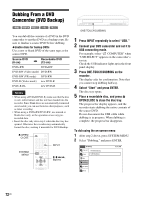
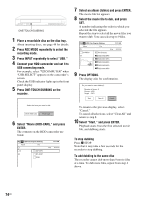
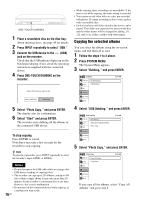
3 Select "USB Dubbing," and press ENTER. No Disc USB Dubbing Title List Timer Edit DVD Backup HDD-Cam Program Dubbing Photo Copy Dubbing Disc Setting Setup 10:10 AM 4 Select "DVD Backup," and press ENTER. The display asks for confirmation. 5 Select "Start," and press ENTER. The disc tray opens. 6 Place a recordable disc, and press Z OPEN/ CLOSE to close the disc tray. Dubbing starts. Dubbing From a HDD Camcorder (Program Dubbing) +RW -RWVideo +R -RVideo You can dub the selected movie files from a HDD camcorder onto a recordable DVD+RW, DVDRW (Video mode), DVD-R (Video mode), or DVD+R. ◆How titles and chapters are created The dubbed contents on the disc become one title, and the title is then divided into chapters at either 5 or 15-minute intervals, according to the "DVD Auto Chapter" setting of "Features" in the "Setup" display. z Hint To play the dubbed disc, press INPUT repeatedly to select the recorder's input (LINE1 or LINE2). Note During dubbing, timer recordings are unavailable. If the timer is set during dubbing, the timer setting is canceled. Note To play the dubbed disc on other DVD equipment, finalize the disc (page 66). If you set "Auto Finalize" to "On" in the "Features" setup (page 85), the Auto Finalize function works for DVDRWs (Video mode), DVD-Rs (Video mode) and DVD+Rs after dubbing. For details, see page 67. 123 456 789 0 INPUT SET M/m/
-
 1
1 -
2
-
3
-
4
-
5
-
6
-
7
-
8
-
9
-
10
-
11
-
12
-
13
-
14
-
15
-
16
-
17
-
18
-
19
-
20
-
21
-
22
-
23
-
24
-
25
-
26
-
27
-
28
-
29
-
30
-
31
-
32
-
33
-
34
-
35
-
36
-
37
-
38
-
39
-
40
-
41
-
42
-
43
-
44
-
45
-
46
-
47
-
48
-
49
-
50
-
51
-
52
-
53
-
54
-
55
-
56
-
57
-
58
-
59
-
60
-
61
-
62
-
63
-
64
-
65
-
66
-
67
-
 68
68 -
 69
69 -
 70
70 -
 71
71 -
 72
72 -
 73
73 -
 74
74 -
 75
75 -
 76
76 -
 77
77 -
 78
78 -
79
-
80
-
81
-
82
-
83
-
84
-
85
-
86
-
87
-
88
-
89
-
90
-
91
-
92
-
93
-
94
-
95
-
96
-
97
-
98
-
99
-
100
-
101
-
102
-
103
-
104
-
105
-
106
-
107
-
108
-
109
-
110
-
111
-
112
-
113
-
114
-
115
-
116
-
117
-
118
-
119
-
120
-
121
-
122
-
123
-
124
-
125
-
126
-
127
-
128
 |
 |
