Sony RDR-GX360 Operating Instructions - Page 78
Settings and Adjustments, Using the Setup Displays
 |
UPC - 027242735507
View all Sony RDR-GX360 manuals
Add to My Manuals
Save this manual to your list of manuals |
Page 78 highlights
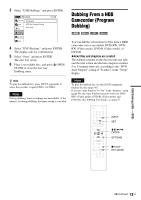
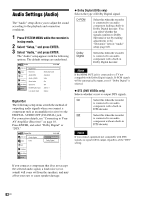
Settings and Adjustments Using the Setup Displays By using the setup displays, you can make various adjustments to items such as picture and sound, as well as select a language for the subtitles. The setup displays are used in the following way. Note Playback settings stored on the disc take priority over the setup display settings, and not all of the functions described may work. SYSTEM MENU 123 456 789 0 O RETURN M/m/
-
 1
1 -
2
-
3
-
4
-
5
-
6
-
7
-
8
-
9
-
10
-
11
-
12
-
13
-
14
-
15
-
16
-
17
-
18
-
19
-
20
-
21
-
22
-
23
-
24
-
25
-
26
-
27
-
28
-
29
-
30
-
31
-
32
-
33
-
34
-
35
-
36
-
37
-
38
-
39
-
40
-
41
-
42
-
43
-
44
-
45
-
46
-
47
-
48
-
49
-
50
-
51
-
52
-
53
-
54
-
55
-
56
-
57
-
58
-
59
-
60
-
61
-
62
-
63
-
64
-
65
-
66
-
67
-
68
-
69
-
70
-
71
-
72
-
 73
73 -
 74
74 -
 75
75 -
 76
76 -
 77
77 -
 78
78 -
 79
79 -
 80
80 -
 81
81 -
 82
82 -
 83
83 -
84
-
85
-
86
-
87
-
88
-
89
-
90
-
91
-
92
-
93
-
94
-
95
-
96
-
97
-
98
-
99
-
100
-
101
-
102
-
103
-
104
-
105
-
106
-
107
-
108
-
109
-
110
-
111
-
112
-
113
-
114
-
115
-
116
-
117
-
118
-
119
-
120
-
121
-
122
-
123
-
124
-
125
-
126
-
127
-
128
 |
 |

78
US
Settings and Adjustments
Using the Setup Displays
By using the setup displays, you can make various
adjustments to items such as picture and sound, as
well as select a language for the subtitles.
The setup displays are used in the following way.
Note
Playback settings stored on the disc take priority over the
setup display settings, and not all of the functions
described may work.
1
Press SYSTEM MENU while the recorder is
in stop mode.
The System Menu appears.
2
Select “Setup,” and press ENTER.
The “Setup” display appears.
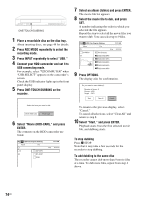
3
Select “Clock Set,” “Video,” “Audio,”
“Features,” “Options,” or “Easy Setup,”
and press ENTER.
The selected setup display appears.
Example: “Video” setup
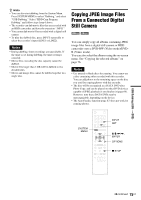
4
Select the item you want to set up, and
press ENTER.
Available options for the item appear.
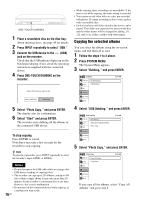
Example: “TV Type”
M
/
m
/
<
/
,
,
ENTER
1
2
3
4
5
6
7
8
0
9
SYSTEM
MENU
O
RETURN
10:10 AM
Title List (Original)
Press ENTER :
Title Menu for DVD Title List.
Setup
Disc Setting
Edit
Title List
Timer
Dubbing
10:10 AM
Clock Set
Video
Audio
Features
Options
Easy Setup
Setup
Disc Setting
Edit
Title List
Timer
Dubbing
Setup
Video
10:10 AM
TV Type
Resolution (HDMI)
Video (HDMI)
Black Level
Picture Control
Progressive
Line1 Input
:
4:3 Letter Box
:
Auto
:
Y Cb Cr
:
On
:
Standard
:
Off
:
Composite
Setup
Disc Setting
Edit
Title List
Timer
Dubbing
Video
10:10 AM
TV Type
Resolution (HDMI)
Video (HDMI)
Black Level
Picture Control
Progressive
Line1 Input
:
4:3 Letter Box
:
Auto
:
Y Cb Cr
:
On
:
Standard
:
Off
:
Composite
Setup
Disc Setting
Edit
Title List
Timer
Dubbing
16:9
4:3 Letter Box
4:3 Pan Scan