Sony RDR-GX360 Operating Instructions - Page 93
Others, The Set Top Box Control function does
 |
UPC - 027242735507
View all Sony RDR-GX360 manuals
Add to My Manuals
Save this manual to your list of manuals |
Page 93 highlights
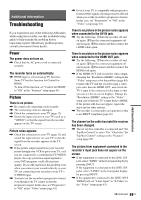
Others The recorder does not operate properly. , Restart the recorder. Press down "/1 on the recorder for more than ten seconds until "SONY DVD" appears in the front panel display. , When static electricity, etc., causes the recorder to operate abnormally, turn off the recorder and wait until the clock appears in the front panel display. Then, unplug the recorder and after leaving it off for a while, plug it in again. , If you change the HDMI connection, connect and disconnect the AC power cord, or have a power failure, set "Control for HDMI" to "Off" in the "Features" setup, then set it to "On" (page 85). The recorder does not detect a USB device connected to the recorder. , Make sure that the USB device is securely connected to the recorder (page 71). , Check if the USB device or a cable is damaged. , Check if the USB device is tuned on. The disc tray does not open after you press Z OPEN/CLOSE. , It may take a few seconds for the disc tray to open after you have recorded or edited a disc. This is because the recorder is adding disc data to the disc. "Cannot record because of high temperature." appears on the TV screen. , Check that the vent on the rear of the recorder is not blocked. Then, turn off the recorder, wait until the clock appears in the front panel display, and disconnect the AC power cord. Leave the recorder off for a while, then re-connect the power cord, and press "/1 on the recorder. "CHILD LOCK" appears in the front panel display. , The recorder is locked. Cancel the Child Lock (page 37). Control by AV mouse is not possible. , Some satellite receivers may not support AV mouse. The Set Top Box Control function does not work. , Turn on the recorder. The Control for HDMI function does not work. , When "HDMI" does not appear in the front panel display, check the HDMI connection (page 16). , Set "Control for HDMI" to "On" in the "Features" setup (page 85). , Make sure that the connected component is compatible with the Control for HDMI function. Please refer to the operating instructions of the component for detailed explanation. Additional Information 93US
-
 1
1 -
2
-
3
-
4
-
5
-
6
-
7
-
8
-
9
-
10
-
11
-
12
-
13
-
14
-
15
-
16
-
17
-
18
-
19
-
20
-
21
-
22
-
23
-
24
-
25
-
26
-
27
-
28
-
29
-
30
-
31
-
32
-
33
-
34
-
35
-
36
-
37
-
38
-
39
-
40
-
41
-
42
-
43
-
44
-
45
-
46
-
47
-
48
-
49
-
50
-
51
-
52
-
53
-
54
-
55
-
56
-
57
-
58
-
59
-
60
-
61
-
62
-
63
-
64
-
65
-
66
-
67
-
68
-
69
-
70
-
71
-
72
-
73
-
74
-
75
-
76
-
77
-
78
-
79
-
80
-
81
-
82
-
83
-
84
-
85
-
86
-
87
-
 88
88 -
 89
89 -
 90
90 -
 91
91 -
 92
92 -
 93
93 -
 94
94 -
 95
95 -
 96
96 -
 97
97 -
 98
98 -
99
-
100
-
101
-
102
-
103
-
104
-
105
-
106
-
107
-
108
-
109
-
110
-
111
-
112
-
113
-
114
-
115
-
116
-
117
-
118
-
119
-
120
-
121
-
122
-
123
-
124
-
125
-
126
-
127
-
128
 |
 |
