Sony RM-BR300 Operating Instructions - Page 7
Functions of the POSITION buttons for, the EVI-D100/D100P and EVI-D70/D70P, cameras, Zooming - joystick
 |
View all Sony RM-BR300 manuals
Add to My Manuals
Save this manual to your list of manuals |
Page 7 highlights
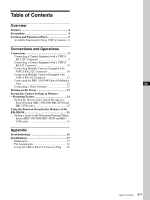
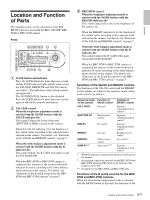
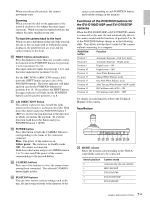
Overview When you release the joystick, the camera movement stops. Zooming When you turn the dial on the upper part of the joystick clockwise, the subject becomes larger (zoom in). When you turn it counterclockwise, the subject becomes smaller (zoom out). To face the camera back to the front When you press the button on the top of the joystick for one or two seconds with or without the menu displayed, the pan/tilt/zoom are reset and the camera returns to the front. P SHIFT button and indicators Press this button for more than one second to select the function of the POSITION buttons for positions 1 to 8 or positions 9 to 16. The upper indicator lights for positions 1 to 8, and the lower indicator for positions 9 to 16. For the BRC-H700 or BRC-Z700 camera, hold down the SHIFT button and press one of the POSITION buttons. The lower indicator will light and you can use the POSITION buttons for positions 9 to 16. If you release the SHIFT button, the upper indicator will light and the POSITION buttons can be used for positions 1 to 8. Q L/R DIRECTION button The camera is preset to face toward the right whenever the joystick is inclined to the right. Hold down this button and press POSITION button 2 (REV) to reverse the pan direction to the direction in which you incline the joystick. To reset the direction, hold down this button and press POSITION button 1 (STD). R POWER button Press this button to light the CAMERA button(s) corresponding to the status of the connected camera(s). Blue: The power of the camera is on. Yellow green: The camera is in standby mode. Off: No camera is connected. Hold down this button and press CAMERA button 1 to 7 to turn on/off the power of the camera corresponding to the pressed button. S CAMERA buttons Press one of the buttons to select the camera from among those connected. The selected CAMERA button lights in blue. T POSITION buttons You can store various camera settings such as the pan, tilt and zoom positions to the memory of the camera corresponding to each POSITION button, and load the settings in the memory. Functions of the POSITION buttons for the EVI-D100/D100P and EVI-D70/D70P cameras When the EVI-D100/D100P or EVI-D70/D70P camera is connected to this unit, the unit automatically detects the camera model and the functions of positions 7 to 16 of the POSITION buttons change as in the following table. This allows you the direct control of the camera without connecting to a computer. POSITION button Function Position 7 Automatic Exposure - Full Auto mode Position 8 Automatic Exposure - Bright mode Position 9 Digital zoom - ON Position 10 Digital zoom - OFF Position 11 Auto White Balance mode Position 12 Manual White Balance mode Position 13 One Push White Balance mode Position 14 Auto Tracing White Balance (ATW) mode Position 15 IR Cut-Removable (ICR) - ON Position 16 IR Cut-Removable (ICR) - OFF For details on each function, refer to the Technical Manual of the camera. Rear/Bottom MODE RS-232C VISCA RS-422 TALLY/CONTACT ! CONTACT(TALLY) TALLY 1 9 1 9 CONTACT DC IN 12V ON/OFF wa ws wd wf wg wh wj wk U MODE selector Select the position corresponding to the VISCAcontrollable camera to be connected. Switch position 0 1 2 3 4 Camera mode Automatically selected (default) BRC-300/300P EVI-D70/D70P EVI-D100/D100P EVI-D30/D30P 7 Location and Function of Parts GB
-
 1
1 -
 2
2 -
 3
3 -
 4
4 -
 5
5 -
 6
6 -
 7
7 -
 8
8 -
 9
9 -
 10
10 -
 11
11 -
 12
12 -
13
-
14
-
15
-
16
-
17
-
18
-
19
-
20
-
21
-
22
-
23
-
24
-
25
-
26
-
27
-
28
-
29
-
30
-
31
-
32
-
33
-
34
-
35
-
36
-
37
-
38
-
39
-
40
-
41
-
42
-
43
-
44
-
45
-
46
-
47
-
48
-
49
-
50
-
51
-
52
-
53
-
54
-
55
-
56
-
57
-
58
-
59
-
60
-
61
-
62
-
63
-
64
-
65
-
66
-
67
-
68
-
69
-
70
-
71
-
72
-
73
-
74
-
75
-
76
-
77
-
78
-
79
-
80
 |
 |