Sony RM-BR300 Operating Instructions - Page 9
Connections and Operations, Connections, Connecting a Camera Equipped with a VISCA RS-232C Connector
 |
View all Sony RM-BR300 manuals
Add to My Manuals
Save this manual to your list of manuals |
Page 9 highlights
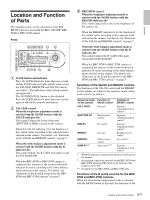
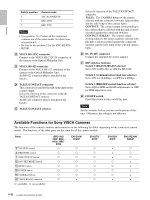
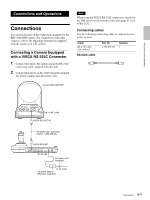
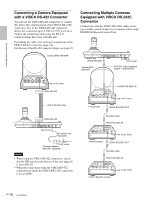
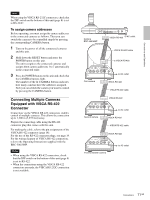
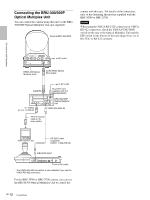
Connections and Operations Connections and Operations Connections This section focuses on the connection examples for the BRC-300/300P camera. For connections with other cameras, refer to the Operating Instructions supplied with the camera you will connect. Connecting a Camera Equipped with a VISCA RS-232C Connector 1 Connect this unit to the camera using the RS-232C connecting cable supplied with this unit. 2 Connect this unit to an AC outlet using the supplied AC power adaptor and AC power cord. Note When using the VISCA RS-232C connectors, check that the DIP switch on the bottom of this unit (page 8) is set to RS-232C. Connecting cables Use the following connecting cable to connect devices in this system. Cable RS-232C cable (3m (10feet)) Part No. 1-590-879-3X Number 1 RS-232C cable Camera BRC-300/300P R 1 2 3 OFF ON 75 IR SELECT 1 2 3 4 5 6 7 8 9 VISCA RS-422 ! EXT SYNC IN VIDEO S VIDEO IN VISCA RS-232C OUT DC IN 12V to AC outlet VISCA RS-232C IN RS-232C cable (supplied) (SONY: 1-590-879-3X) VISCA RS-232C DC IN 12V AC power cord (supplied) to AC outlet AC power adaptor MPA-AC1 (supplied) 9 Connections GB
-
 1
1 -
2
-
3
-
 4
4 -
 5
5 -
 6
6 -
 7
7 -
 8
8 -
 9
9 -
 10
10 -
 11
11 -
 12
12 -
 13
13 -
 14
14 -
15
-
16
-
17
-
18
-
19
-
20
-
21
-
22
-
23
-
24
-
25
-
26
-
27
-
28
-
29
-
30
-
31
-
32
-
33
-
34
-
35
-
36
-
37
-
38
-
39
-
40
-
41
-
42
-
43
-
44
-
45
-
46
-
47
-
48
-
49
-
50
-
51
-
52
-
53
-
54
-
55
-
56
-
57
-
58
-
59
-
60
-
61
-
62
-
63
-
64
-
65
-
66
-
67
-
68
-
69
-
70
-
71
-
72
-
73
-
74
-
75
-
76
-
77
-
78
-
79
-
80
 |
 |
