Sony STR-DG800 Operating Instructions - Page 68
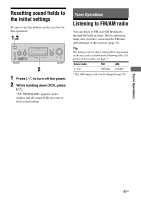
Using the controls on the, receiver, In case of poor FM stereo, reception, Automatic tuning
 |
UPC - 027242683075
View all Sony STR-DG800 manuals
Add to My Manuals
Save this manual to your list of manuals |
Page 68 highlights
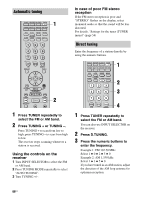
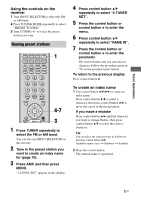
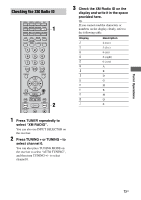
Automatic tuning TV/SAT MD/TAPE SA-CD/CD TUNER 1 PHONO MULTI CH SOURCE 2ND ZONE 2CH A.F.D. MOVIE MUSIC CATEGORY SLEEP MODE D. TUNING AUTO CAL 123 456 7 - /- - CLEAR >10 DISPLAY 89 0/10 ENTER MEMORY TOOLS V < B B v RETURN/ EXIT MENU - CATEGORY + REPLAY ADVANCE .< AMP > TUNING - m H TUNING + M 2 DISC SKIP X x 1 Press TUNER repeatedly to select the FM or AM band. 2 Press TUNING + or TUNING -. Press TUNING + to scan from low to high; press TUNING - to scan from high to low. The receiver stops scanning whenever a station is received. Using the controls on the receiver 1 Turn INPUT SELECTOR to select the FM or AM band. 2 Press TUNING MODE repeatedly to select "AUTO TUNING". 3 Turn TUNING +/-. In case of poor FM stereo reception If the FM stereo reception is poor and "STEREO" flashes on the display, select monaural audio so that the sound will be less distorted. For details, "Settings for the tuner (TUNER menu)" (page 54) Direct tuning Enter the frequency of a station directly by using the numeric buttons. TV/SAT MD/TAPE SA-CD/CD TUNER 1 PHONO MULTI CH SOURCE 2ND ZONE 2CH A.F.D. MOVIE MUSIC CATEGORY SLEEP MODE D. TUNING AUTO CAL 2 123 456 3 789 - /- - CLEAR 0/10 ENTER 4 >10 MEMORY 1 Press TUNER repeatedly to select the FM or AM band. You can also use INPUT SELECTOR on the receiver. 2 Press D.TUNING. 3 Press the numeric buttons to enter the frequency. Example 1: FM 102.50 MHz Select 1 b 0 b 2 b 5 b 0 Example 2: AM 1,350 kHz Select 1 b 3 b 5 b 0 If you have tuned in an AM station, adjust the direction of the AM loop antenna for optimum reception. 68US
-
 1
1 -
2
-
3
-
4
-
5
-
6
-
7
-
8
-
9
-
10
-
11
-
12
-
13
-
14
-
15
-
16
-
17
-
18
-
19
-
20
-
21
-
22
-
23
-
24
-
25
-
26
-
27
-
28
-
29
-
30
-
31
-
32
-
33
-
34
-
35
-
36
-
37
-
38
-
39
-
40
-
41
-
42
-
43
-
44
-
45
-
46
-
47
-
48
-
49
-
50
-
51
-
52
-
53
-
54
-
55
-
56
-
57
-
58
-
59
-
60
-
61
-
62
-
 63
63 -
 64
64 -
 65
65 -
 66
66 -
 67
67 -
 68
68 -
 69
69 -
 70
70 -
 71
71 -
 72
72 -
 73
73 -
74
-
75
-
76
-
77
-
78
-
79
-
80
-
81
-
82
-
83
-
84
-
85
-
86
-
87
-
88
-
89
-
90
-
91
-
92
-
93
-
94
-
95
-
96
-
97
-
98
-
99
-
100
 |
 |
