Sony STR-DG800 Operating Instructions - Page 86
Using the Remote, Programming the remote - parts
 |
UPC - 027242683075
View all Sony STR-DG800 manuals
Add to My Manuals
Save this manual to your list of manuals |
Page 86 highlights
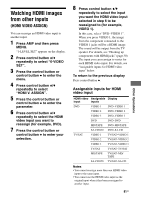
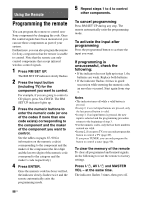
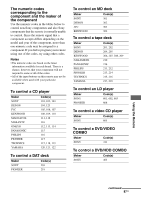
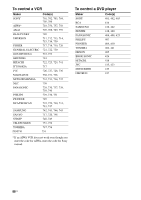
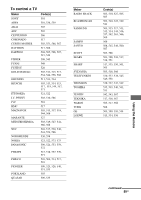
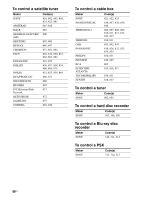
Using the Remote Programming the remote You can program the remote to control nonSony components by changing the code. Once the control signals have been memorized, you can use those components as part of your system. Furthermore, you can also program the remote for Sony components that the remote is unable to control. Note that the remote can only control components that accept infrared wireless control signals. 1 Press RM SET UP. The RM SET UP indicator slowly flashes. 2 Press the input button (including TV) for the component you want to control. For example, if you are going to control a CD player, press SA-CD/CD. The RM SET UP indicator lights up. 3 Press the numeric buttons to enter the numeric code (or one of the codes if more than one code exists) corresponding to the component and the maker of the component you want to control. See the tables on pages 87-90 for information on the numeric code(s) corresponding to the component and the maker of the component (the first digit and the last two digits of the numeric code correspond to the category and the maker's code respectively.) 4 Press ENTER. Once the numeric code has been verified, the indicator slowly flashes twice and the remote automatically exits the programming mode. 5 Repeat steps 1 to 4 to control other components. To cancel programming Press RM SET UP during any step. The remote automatically exits the programming mode. To activate the input after programming Press the programmed button to activate the input you want. If programming is unsuccessful, check the following: • If the indicator does not light up in step 1, the batteries are weak. Replace both batteries. • If the indicator flashes 4 times in quick succession while entering the numeric code, an error has occurred. Start again from step 1. Notes • The indicator turns off while a valid button is pressed. • In step 2, if several input buttons are pressed, only the last pressed button is valid. • In step 3, if an input button is pressed, the new input is selected and the programming procedure returns to the beginning of step 3. • For the numeric codes, only the last three numbers entered are valid. • In step 2, if you press TV, you can only program the button to control a TV (page 89). If you press TUNER, you can only program the button to control a tuner (page 90). To clear the memory of the remote To clear all programmed and learned signals, do the following to reset the remote to factory settings. Press ?/1, AV ?/1 and MASTER VOL - at the same time. The indicator flashes 3 times, then goes off. 86US
-
 1
1 -
2
-
3
-
4
-
5
-
6
-
7
-
8
-
9
-
10
-
11
-
12
-
13
-
14
-
15
-
16
-
17
-
18
-
19
-
20
-
21
-
22
-
23
-
24
-
25
-
26
-
27
-
28
-
29
-
30
-
31
-
32
-
33
-
34
-
35
-
36
-
37
-
38
-
39
-
40
-
41
-
42
-
43
-
44
-
45
-
46
-
47
-
48
-
49
-
50
-
51
-
52
-
53
-
54
-
55
-
56
-
57
-
58
-
59
-
60
-
61
-
62
-
63
-
64
-
65
-
66
-
67
-
68
-
69
-
70
-
71
-
72
-
73
-
74
-
75
-
76
-
77
-
78
-
79
-
80
-
 81
81 -
 82
82 -
 83
83 -
 84
84 -
 85
85 -
 86
86 -
 87
87 -
 88
88 -
 89
89 -
 90
90 -
 91
91 -
92
-
93
-
94
-
95
-
96
-
97
-
98
-
99
-
100
 |
 |
