Sony STR-DH770 Help Guide Printable PDF - Page 32
Inserting batteries into the remote control, Turning on the receiver
 |
View all Sony STR-DH770 manuals
Add to My Manuals
Save this manual to your list of manuals |
Page 32 highlights
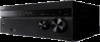
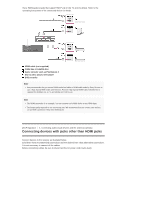
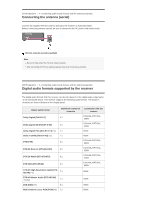
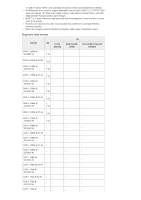
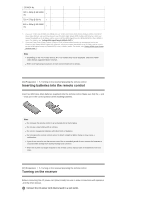
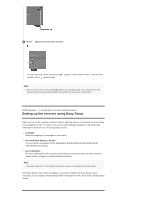
23.98/24 Hz 720 × 480p @ 59.94/60 Hz ○- - - 720 × 576p @ 50 Hz ○- - - 640 × 480p @ 59.94/60 Hz ○- - - *1 If you use YCbCr 4:4:4/YCbCr 4:2:2/RGB 4:4:4 or YCbCr 4:2:0 Deep Color (Deep Colour) (10 bit or 12 bit) of these video formats, we recommend you to use Premium High Speed HDMI Cables with Ethernet, which can support bandwidth up to 18 Gbps, and be sure to set the HDMI signal format to [ENHANCED] in the [] menu. For details, see "Setting HDMI signal format (SIGNAL FMT.)." *2 If you use Deep Color (Deep Colour) (10 bit or 12 bit) of these video formats, we recommend you to use Premium High Speed HDMI Cables with Ethernet, which can support bandwidth up to 18 Gbps, and be sure to set the HDMI signal format to [ENHANCED] in the [] menu. For details, see "Setting HDMI signal format (SIGNAL FMT.)." Note Depending on the TV or video device, 4K or 3D content may not be displayed. Check the HDMI video formats supported by the receiver. Refer to the operating instructions of each connected device for details. [31] Preparation 5. Turning on the receiver/preparing the remote control Inserting batteries into the remote control Insert two R03 (size AAA) batteries (supplied) into the remote control. Make sure that the + and - ends are in the correct position when installing batteries. Note Do not leave the remote control in an extremely hot or humid place. Do not use a new battery with an old one. Do not mix manganese batteries with other kinds of batteries. Do not expose the remote control sensor to direct sunlight or lights. Doing so may cause a malfunction. If you do not intend to use the remote control for an extended period of time, remove the batteries to avoid possible damage from battery leakage and corrosion. When the receiver no longer responds to the remote control, replace both of the batteries with new ones. [32] Preparation 5. Turning on the receiver/preparing the remote control Turning on the receiver Before connecting the AC power cord (mains lead), be sure to make connections with speakers and the other devices. 1 Connect the AC power cord (mains lead) to a wall outlet.
-
 1
1 -
2
-
3
-
4
-
5
-
6
-
7
-
8
-
9
-
10
-
11
-
12
-
13
-
14
-
15
-
16
-
17
-
18
-
19
-
20
-
21
-
22
-
23
-
24
-
25
-
26
-
 27
27 -
 28
28 -
 29
29 -
 30
30 -
 31
31 -
 32
32 -
 33
33 -
 34
34 -
 35
35 -
 36
36 -
 37
37 -
38
-
39
-
40
-
41
-
42
-
43
-
44
-
45
-
46
-
47
-
48
-
49
-
50
-
51
-
52
-
53
-
54
-
55
-
56
-
57
-
58
-
59
-
60
-
61
-
62
-
63
-
64
-
65
-
66
-
67
-
68
-
69
-
70
-
71
-
72
-
73
-
74
-
75
-
76
-
77
-
78
-
79
-
80
-
81
-
82
-
83
-
84
-
85
-
86
-
87
-
88
-
89
-
90
-
91
-
92
-
93
-
94
-
95
-
96
-
97
-
98
-
99
-
100
-
101
-
102
-
103
-
104
-
105
-
106
-
107
 |
 |