Sony STR-DH770 Help Guide Printable PDF - Page 36
Selecting the front speakers, Performing Auto Calibration - speaker setup
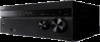 |
View all Sony STR-DH770 manuals
Add to My Manuals
Save this manual to your list of manuals |
Page 36 highlights
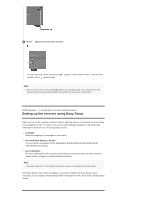
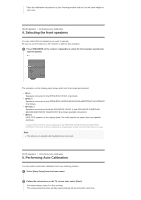
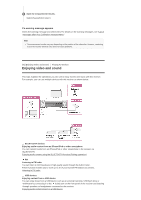
Place the calibration microphone at your listening position and set it at the same height as your ears. [39] Preparation Performing Auto Calibration 4. Selecting the front speakers You can select the front speakers you want to operate. Be sure to use the buttons on the receiver to perform this operation. 1 Press SPEAKERS on the receiver repeatedly to select the front speaker system you want to operate. The indicators on the display panel shows which set of terminals are selected. SP A: Speakers connected to the SPEAKERS FRONT A terminals. SP B (*): Speakers connected to the SPEAKERS SURROUND BACK/BI-AMP/FRONT HIGH/FRONT B terminals. SP A B (*): Speakers connected to both the SPEAKERS FRONT A and SPEAKERS SURROUND BACK/BI-AMP/FRONT HIGH/FRONT B terminals (parallel connection). (None): [SPK OFF] appears on the display panel. No audio signals are output from any speaker terminals. * To select [SP B] or [SP A B], set the assignment for the SPEAKERS SURROUND BACK/BI-AMP/FRONT HIGH/FRONT B terminals to [Front B Speakers] by using [Speaker Setting] - [Surround Back Speakers Assign]. Note This setting is not available when headphones are connected. [40] Preparation Performing Auto Calibration 5. Performing Auto Calibration You can perform automatic calibration from your listening position. 1 Select [Easy Setup] from the home menu. 2 Follow the instructions on the TV screen, then select [Start]. The measurement starts in a few seconds. The measurement process will take approximately 30 seconds with a test tone.
-
 1
1 -
2
-
3
-
4
-
5
-
6
-
7
-
8
-
9
-
10
-
11
-
12
-
13
-
14
-
15
-
16
-
17
-
18
-
19
-
20
-
21
-
22
-
23
-
24
-
25
-
26
-
27
-
28
-
29
-
30
-
 31
31 -
 32
32 -
 33
33 -
 34
34 -
 35
35 -
 36
36 -
 37
37 -
 38
38 -
 39
39 -
 40
40 -
 41
41 -
42
-
43
-
44
-
45
-
46
-
47
-
48
-
49
-
50
-
51
-
52
-
53
-
54
-
55
-
56
-
57
-
58
-
59
-
60
-
61
-
62
-
63
-
64
-
65
-
66
-
67
-
68
-
69
-
70
-
71
-
72
-
73
-
74
-
75
-
76
-
77
-
78
-
79
-
80
-
81
-
82
-
83
-
84
-
85
-
86
-
87
-
88
-
89
-
90
-
91
-
92
-
93
-
94
-
95
-
96
-
97
-
98
-
99
-
100
-
101
-
102
-
103
-
104
-
105
-
106
-
107
 |
 |
