Sony STR-DH770 Help Guide Printable PDF - Page 9
Indicators on the display panel - optical input
 |
View all Sony STR-DH770 manuals
Add to My Manuals
Save this manual to your list of manuals |
Page 9 highlights
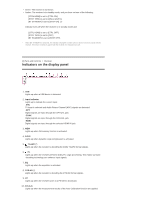
Green: The receiver is turned on. Amber: The receiver is in standby mode, and you have set one of the following: [CTRL HDMI] is set to [CTRL ON]. [STBY THRU] is set to [ON] or [AUTO]. [BT STANDBY] is set to [STBY ON]. (*) Indicator turns off when the receiver is in standby mode and: [CTRL HDMI] is set to [CTRL OFF]. [STBY THRU] is set to [OFF]. [BT STANDBY] is set to [STBY OFF]. * When [BT STANDBY] is activated, the indicator only lights in amber when a device has been paired with the receiver. If there are no devices paired with the receiver, the indicator turns off. [4] Parts and Controls Receiver Indicators on the display panel 1. USB Lights up when a USB device is detected. 2. Input indicator Lights up to indicate the current input. ARC TV input is selected and Audio Return Channel (ARC) signals are detected. OPT Digital signals are input through the OPTICAL jack. COAX Digital signals are input through the COAXIAL jack. HDMI Digital signals are input through the selected HDMI IN jack. 3. MEM Lights up when FM memory function is activated. 4. D.R.C. Lights up when dynamic range compression is activated. 5. TrueHD (*) Lights up when the receiver is decoding the Dolby TrueHD format signals. 6. PL Lights up when the receiver performs Dolby Pro Logic processing. This matrix surround decoding technology can enhance input signals. 7. EQ Lights up when the equalizer is activated. 8. DTS-HD (*) Lights up when the receiver is decoding the DTS-HD format signals. 9. ST Lights up when the receiver tunes to a FM stereo broadcast. 10. D.C.A.C. Lights up when the measurement results of the Auto Calibration function are applied.
-
 1
1 -
2
-
3
-
 4
4 -
 5
5 -
 6
6 -
 7
7 -
 8
8 -
 9
9 -
 10
10 -
 11
11 -
 12
12 -
 13
13 -
 14
14 -
15
-
16
-
17
-
18
-
19
-
20
-
21
-
22
-
23
-
24
-
25
-
26
-
27
-
28
-
29
-
30
-
31
-
32
-
33
-
34
-
35
-
36
-
37
-
38
-
39
-
40
-
41
-
42
-
43
-
44
-
45
-
46
-
47
-
48
-
49
-
50
-
51
-
52
-
53
-
54
-
55
-
56
-
57
-
58
-
59
-
60
-
61
-
62
-
63
-
64
-
65
-
66
-
67
-
68
-
69
-
70
-
71
-
72
-
73
-
74
-
75
-
76
-
77
-
78
-
79
-
80
-
81
-
82
-
83
-
84
-
85
-
86
-
87
-
88
-
89
-
90
-
91
-
92
-
93
-
94
-
95
-
96
-
97
-
98
-
99
-
100
-
101
-
102
-
103
-
104
-
105
-
106
-
107
 |
 |
