Sony UP-897MD User Instructions - Page 31
Getting Started, Overview, Location and Function of Parts and Controls, Front Panel - paper
 |
View all Sony UP-897MD manuals
Add to My Manuals
Save this manual to your list of manuals |
Page 31 highlights
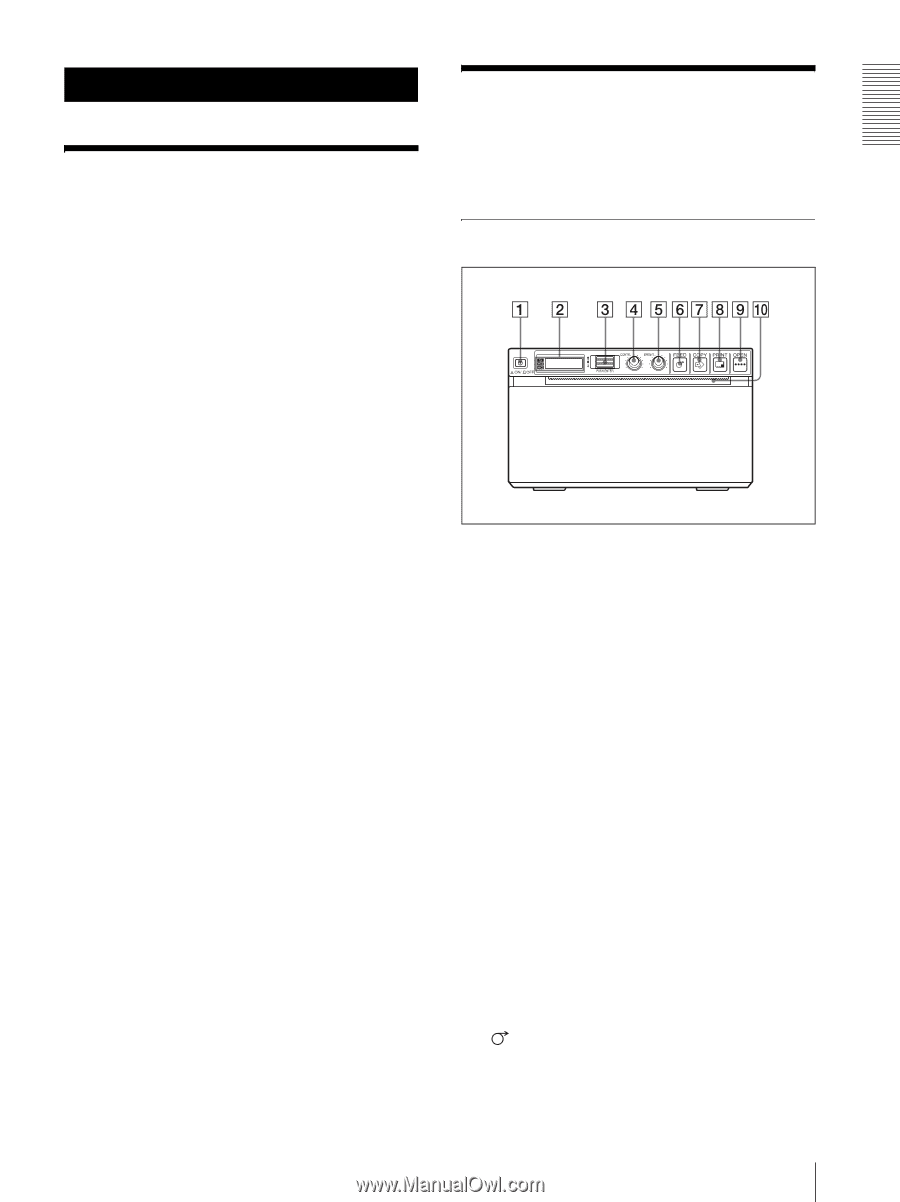
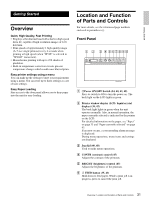
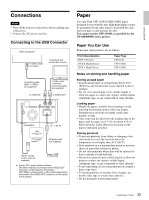
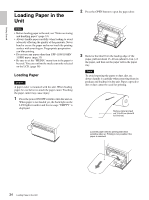
Getting Started Getting Started Overview Quiet, High Quality, Fast Printing • Employs a thin thermal head with a built-in high speed drive IC, capable of high resolution images of 12.8 dots/mm. • Print speeds of approximately 1 high quality image (A-7 size single printout) every 2 seconds when printing at high speed (when "SP:HI" is selected in "SPEED" menu item). • Monochrome printing with up to 256 shades of gradation. • Built-in temperature correction circuits prevent temperature changes which could cause blurred prints. Easy printer settings using a menu You can make up the settings to meet your requirements using a menu. You can store up to three settings as a set of user settings. Easy Paper Loading Free access to the door panel allows you to drop paper into the unit for easy loading. Location and Function of Parts and Controls For more details, see the referenced page numbers enclosed in parentheses (). Front Panel A !Power ON/OFF Switch (34, 40, 42, 48) Press to switch to ON to turn the power on. The back light on the LCD lights in green. B Printer window display (LCD: liquid crystal display) (36, 42) The back light lights in green when the unit operates normally. Also, in normal operation, the paper currently selected is indicated by the pointer on the LCD. For detailed information on the paper, see "Paper" on page 33 and "Paper currently selected" on page 43. If an error occurs, a corresponding alarm message is displayed. During menu operations, menu items and settings are displayed C Jog dial (40, 48) Used to make menu operations. D CONTR (contrast) control (45) Adjusts the contrast of the printouts. E BRIGHT (brightness) control (45) Adjusts the brightness of the printouts. F FEED button (35, 43) Hold down to feed paper. While a print job is in progress, press to cancel the print job. 31 Overview / Location and Function of Parts and Controls
-
 1
1 -
2
-
3
-
4
-
5
-
6
-
7
-
8
-
9
-
10
-
11
-
12
-
13
-
14
-
15
-
16
-
17
-
18
-
19
-
20
-
21
-
22
-
23
-
24
-
25
-
 26
26 -
 27
27 -
 28
28 -
 29
29 -
 30
30 -
 31
31 -
 32
32 -
 33
33 -
 34
34 -
 35
35 -
 36
36 -
37
-
38
-
39
-
40
-
41
-
42
-
43
-
44
-
45
-
46
-
47
-
48
-
49
-
50
-
51
-
52
-
53
-
54
-
55
-
56
-
57
-
58
-
59
-
60
-
61
-
62
-
63
-
64
-
65
-
66
-
67
-
68
-
69
-
70
-
71
-
72
-
73
-
74
-
75
-
76
-
77
-
78
-
79
-
80
-
81
-
82
-
83
-
84
-
85
-
86
-
87
-
88
-
89
-
90
-
91
-
92
-
93
-
94
-
95
-
96
-
97
-
98
-
99
-
100
-
101
-
102
-
103
-
104
-
105
-
106
-
107
-
108
-
109
-
110
-
111
-
112
-
113
-
114
-
115
-
116
-
117
-
118
-
119
-
120
-
121
-
122
-
123
-
124
-
125
-
126
-
127
-
128
-
129
-
130
-
131
-
132
-
133
-
134
-
135
-
136
-
137
-
138
-
139
-
140
-
141
-
142
-
143
-
144
-
145
-
146
-
147
-
148
-
149
-
150
-
151
-
152
-
153
-
154
-
155
-
156
-
157
-
158
-
159
-
160
 |
 |