Sony UP-897MD User Instructions - Page 41
Registering Menu Settings, Loading the desired settings
 |
View all Sony UP-897MD manuals
Add to My Manuals
Save this manual to your list of manuals |
Page 41 highlights
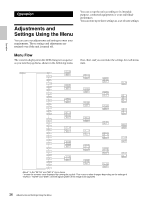
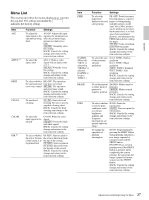
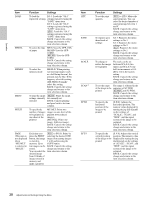
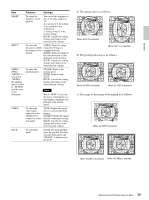
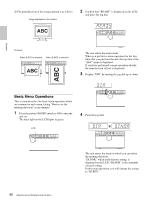
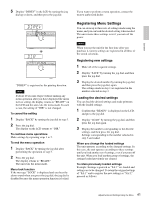
Operation 5 Display "DI:REV" in the LCD by turning the jog dial up or down, and then press the jog dial. "DI:REV" is registered as the printing direction. Note If about 20 seconds elapse without making any menu operation after you have displayed the menu item or setting, the display returns to "READY" on the LCD and the unit exits the menu mode. In such a case, the setting of "DIR" is not changed. To cancel the setting 1 Display "BACK" by turning the jog dial in step 5. 2 Press the jog dial. The display on the LCD returns to "DIR." To continue menu operations Make settings by repeating steps 3 to 5. To end the menu operation 1 Display "BACK" by turning the jog dial after performing the operation of step 5. 2 Press the jog dial. The display returns to "READY." The unit exits the menu mode. Menu lock function If the message "LOCK" is displayed and you hear the alarm sound when you press the jog dial, the jog dial is disabled because the menu operation function is locked. If you want to perform a menu operation, contact the nearest authorized dealer. Registering Menu Settings You can store up to three sets of settings made using the menu, and you can load the desired setting when needed. The unit retains these settings even if you turn off the power. Note When you use the unit for the first time after you purchase it, factory settings are registered in all three of the stored selections. Registering new settings 1 Make all of the required settings. 2 Display "SAVE" by turning the jog dial, and then press the jog dial. 3 Display the desired number by turning the jog dial, and then press the jog dial, again. The settings made in step 1 are registered in the number selected in step 3. Loading the desired settings You can load the desired settings and make printouts with the loaded settings. 1 Confirm that "READY" is displayed on the LCD, and press the jog dial. 2 Display "LOAD" by turning the jog dial, and then press the jog dial again. 3 Display the number corresponding to the desired settings, and then press the jog dial. Settings corresponding to the number selected in step 3 are loaded. When you change the loaded settings The unit operates according to the changed settings. In this case, the unit operates according to these settings until you load another set of settings, even if you turn off the unit. When you load another group of settings, the settings loaded previously are cleared. To retain previously loaded settings Example: Settings registered as "SA:1" are loaded and settings are to be changed. To retain the original settings of "SA:1" and to register the new settings as "SA:2," proceed as follows. 41 Adjustments and Settings Using the Menu
-
 1
1 -
2
-
3
-
4
-
5
-
6
-
7
-
8
-
9
-
10
-
11
-
12
-
13
-
14
-
15
-
16
-
17
-
18
-
19
-
20
-
21
-
22
-
23
-
24
-
25
-
26
-
27
-
28
-
29
-
30
-
31
-
32
-
33
-
34
-
35
-
 36
36 -
 37
37 -
 38
38 -
 39
39 -
 40
40 -
 41
41 -
 42
42 -
 43
43 -
 44
44 -
 45
45 -
 46
46 -
47
-
48
-
49
-
50
-
51
-
52
-
53
-
54
-
55
-
56
-
57
-
58
-
59
-
60
-
61
-
62
-
63
-
64
-
65
-
66
-
67
-
68
-
69
-
70
-
71
-
72
-
73
-
74
-
75
-
76
-
77
-
78
-
79
-
80
-
81
-
82
-
83
-
84
-
85
-
86
-
87
-
88
-
89
-
90
-
91
-
92
-
93
-
94
-
95
-
96
-
97
-
98
-
99
-
100
-
101
-
102
-
103
-
104
-
105
-
106
-
107
-
108
-
109
-
110
-
111
-
112
-
113
-
114
-
115
-
116
-
117
-
118
-
119
-
120
-
121
-
122
-
123
-
124
-
125
-
126
-
127
-
128
-
129
-
130
-
131
-
132
-
133
-
134
-
135
-
136
-
137
-
138
-
139
-
140
-
141
-
142
-
143
-
144
-
145
-
146
-
147
-
148
-
149
-
150
-
151
-
152
-
153
-
154
-
155
-
156
-
157
-
158
-
159
-
160
 |
 |
