Sony UP-897MD User Instructions - Page 37
Menu List, Function, Settings - sheet head cleaning
 |
View all Sony UP-897MD manuals
Add to My Manuals
Save this manual to your list of manuals |
Page 37 highlights
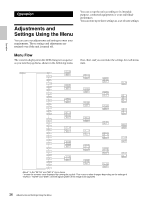
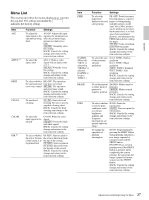
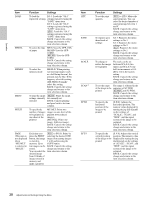
Operation Menu List This section describes the menus displayed as you turn the jog dial. The setting surrounded by indicates the factory setting. Item AGC ASPCT a) BEEP CLEAN COLOR DIR b) Function Settings To adjust the AG:ON: Adjusts the input input signal to the signal to the optimum level, optimum printing when the printout image level appears too dark or too light. [AG:OFF]: Normally select this setting. BACK: Cancels the setting change and returns to the item selection column. To select the aspect ratio AS:1:1: Prints a video signal with an aspect ratio of 1:1. [AS: 4:3]: Normally select this setting. BACK: Cancels the setting change and returns to the item selection column To select whether BE: OFF: The operation the operation and tone does not sound. error tones sound [BE: ON]: The operation and error tones sound. BACK: Cancels the setting change and returns to the item selection column. To start head cleaning [CL: OK]: Starts the head cleaning. Be sure to use the supplied cleaning sheet. BACK: Cancels the head cleaning and returns to the item selection column. To select the input signal to be printed CO:ON: Prints the color signal. [CO:OFF]: Prints the black and white signal. BACK: Cancels the setting change and returns to the item selection column. To select whether DI: REV: Starts to print in the top or bottom the reverse direction (from of the screen is to the top of the screen). be printed first [DI: NOR]: Starts to print in the normal direction (from the bottom of the screen). BACK: Cancels the setting change and returns to the item selection column. Item FEED GAMMA (When the "ME:S" is selected in "MEDIA" is selected, GAMMA is fixed to TONE 1.) IMAGE INFO INTRT Function Settings To select the FE: OFF: Feeds less paper paper feed between prints to conserve method to be used paper, or when printing after printing multiple pictures on the same sheet. More pictures can be printed on one sheet, but because there is so little space between printed pictures, you must press the FEED button before cutting the paper. [FE: ON]: Feeds extra blank paper between prints. BACK: Cancels the setting change and returns to the item selection column. To select the tone GA:4: TONE 4 Softest of the printouts gradation (density GA:3: TONE 3 Hard gradation) gradation [GA:2]: TONE 2 Standard GA:1: TONE 1 Soft gradation BACK: Cancels the setting change and returns to the item selection column. To set the printout IM:NEG: Makes negative to either positive printouts. printout or [IM:POS]: Makes normal negative printout printouts. BACK: Cancels the setting change and returns to the item selection column. To select whether IF:ON: Prints the or not the print information. conditions (such [IF:OFF]: Does not print the as contrast, information. brightness, BACK: Cancels the setting gammas and change and returns to the sharpness item selection column. information) are printed under the image To change the operation of printing interruption IN:ON: Stops printing by pressing the PRINT button during printing and prints a new image captured at instant you pressed the PRINT button. [IN:OFF]: Does not stop printing even if the PRINT button is pressed. After completing the current printing, the unit prints the image captured at instant you pressed the PRINT button. BACK: Cancels the setting change and returns to the item selection column. 37 Adjustments and Settings Using the Menu
-
 1
1 -
2
-
3
-
4
-
5
-
6
-
7
-
8
-
9
-
10
-
11
-
12
-
13
-
14
-
15
-
16
-
17
-
18
-
19
-
20
-
21
-
22
-
23
-
24
-
25
-
26
-
27
-
28
-
29
-
30
-
31
-
 32
32 -
 33
33 -
 34
34 -
 35
35 -
 36
36 -
 37
37 -
 38
38 -
 39
39 -
 40
40 -
 41
41 -
 42
42 -
43
-
44
-
45
-
46
-
47
-
48
-
49
-
50
-
51
-
52
-
53
-
54
-
55
-
56
-
57
-
58
-
59
-
60
-
61
-
62
-
63
-
64
-
65
-
66
-
67
-
68
-
69
-
70
-
71
-
72
-
73
-
74
-
75
-
76
-
77
-
78
-
79
-
80
-
81
-
82
-
83
-
84
-
85
-
86
-
87
-
88
-
89
-
90
-
91
-
92
-
93
-
94
-
95
-
96
-
97
-
98
-
99
-
100
-
101
-
102
-
103
-
104
-
105
-
106
-
107
-
108
-
109
-
110
-
111
-
112
-
113
-
114
-
115
-
116
-
117
-
118
-
119
-
120
-
121
-
122
-
123
-
124
-
125
-
126
-
127
-
128
-
129
-
130
-
131
-
132
-
133
-
134
-
135
-
136
-
137
-
138
-
139
-
140
-
141
-
142
-
143
-
144
-
145
-
146
-
147
-
148
-
149
-
150
-
151
-
152
-
153
-
154
-
155
-
156
-
157
-
158
-
159
-
160
 |
 |
