Sony UP-897MD User Instructions - Page 50
Troubleshooting
 |
View all Sony UP-897MD manuals
Add to My Manuals
Save this manual to your list of manuals |
Page 50 highlights
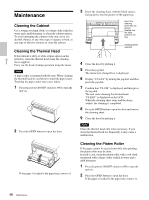
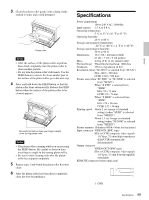
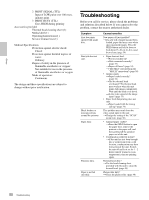
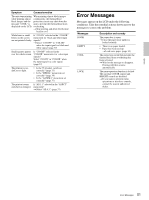
Others 2 PRINT SIGNAL (TTL) Input of LOW pulse over 100 msec. initiates print. 3 PRINT BUSY (TTL) Goes HIGH during printing Accessories provided Thermal head cleaning sheet (1) Media label (1) Operating Instructions (1) Service Contact List (1) Medical Specifications Protection against electric shock: Class I Protection against harmful ingress of water: Ordinary Degree of safety in the presence of flammable anesthetics or oxygen: Not suitable for use in the presence of flammable anesthetics or oxygen Mode of operation: Continuous The design and these specifications are subject to change without prior notification. Troubleshooting Before you call for service, please check the problems and solutions described below. If you cannot solve the problem, contact the nearest authorized dealer. Symptom First few prints spotted with small dots. Print job does not start. Black borders or missing portions around the printout Paper Jams Printouts dirty. Paper is not fed smoothly. Causes/remedies New paper roll just installed? tIf a new roll of paper has just been loaded, paper dust may cause white spots in printed images. Press the FEED button and hold it down to feed about 15~20 cm (6~8 in.) and then release.(page 34) • Paper does not feed. tPower switched on? tUnit connected correctly? (page 33) tPaper roll loose? (page 34) t"MU:MLT" selected from the "MULTI" menu item? (page 38) • Alarm sounds. tPaper loaded correctly? (page 34) tHas the thermal head overheated? The thermal head may overheat when the unit prints dark image continuously. Wait until the head cools down. tIs the video signal of the image input? (page 33) • Paper feeds but printing does not start. tPaper loaded with the wrong side up? (page 34) This problem may result from the video signal input to the unit. tChange the setting of the "SCAN" menu item. (page 38) • Jammed paper visible? tPress the OPEN button to open the paper door, remove the printout or the paper roll, and then gently pull the jammed paper out of the unit. • Condensation collected in unit? tIf the unit has just been brought into a warm room from a cold location, condensation may have formed inside the unit. Switch the unit off and let it set for 1 - 2 hours (until it warms to room temperature), then try printing again. Thermal head dirty? tUse the head cleaning sheet provided with the unit to clean the thermal head. (page 48) Platen roller dirty? tClean the platen roller. (page 48) 50 Troubleshooting
-
 1
1 -
2
-
3
-
4
-
5
-
6
-
7
-
8
-
9
-
10
-
11
-
12
-
13
-
14
-
15
-
16
-
17
-
18
-
19
-
20
-
21
-
22
-
23
-
24
-
25
-
26
-
27
-
28
-
29
-
30
-
31
-
32
-
33
-
34
-
35
-
36
-
37
-
38
-
39
-
40
-
41
-
42
-
43
-
44
-
 45
45 -
 46
46 -
 47
47 -
 48
48 -
 49
49 -
 50
50 -
 51
51 -
 52
52 -
 53
53 -
 54
54 -
 55
55 -
56
-
57
-
58
-
59
-
60
-
61
-
62
-
63
-
64
-
65
-
66
-
67
-
68
-
69
-
70
-
71
-
72
-
73
-
74
-
75
-
76
-
77
-
78
-
79
-
80
-
81
-
82
-
83
-
84
-
85
-
86
-
87
-
88
-
89
-
90
-
91
-
92
-
93
-
94
-
95
-
96
-
97
-
98
-
99
-
100
-
101
-
102
-
103
-
104
-
105
-
106
-
107
-
108
-
109
-
110
-
111
-
112
-
113
-
114
-
115
-
116
-
117
-
118
-
119
-
120
-
121
-
122
-
123
-
124
-
125
-
126
-
127
-
128
-
129
-
130
-
131
-
132
-
133
-
134
-
135
-
136
-
137
-
138
-
139
-
140
-
141
-
142
-
143
-
144
-
145
-
146
-
147
-
148
-
149
-
150
-
151
-
152
-
153
-
154
-
155
-
156
-
157
-
158
-
159
-
160
 |
 |