Sony UP-897MD User Instructions - Page 39
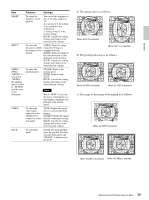
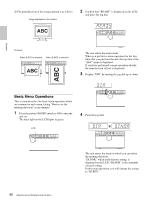
a The aspect ratio is as follows., b The printing direction is as follows. - b w printer
 |
View all Sony UP-897MD manuals
Add to My Manuals
Save this manual to your list of manuals |
Page 39 highlights
Operation Item Function Settings SHARP SIDE d) To adjust the sharpness of the printout You can set the sharpness to any of 15 steps, from 0 to 14. At a setting of 0, the outline of the printout is not emphasized. A setting of step 2 is the factory setting. BACK: Cancels the setting change and returns to the item selection column. To select the S:SIDE: Prints the image direction in which rotated by 90 degrees the image is to be counterclockwise. printed [S:STD]: Prints the image in the same direction as that displayed on the monitor. BACK: Cancels the setting change and returns to the item selection column. SPEED To select the (When printing speed "ME:HD" is selected in "MEDIA," the printing speed is fixed to "SP:NOR" and this item is not displayed.) SP:NOR: Prints at the normal speed. [SP:HI]: Prints at high speed. BACK: Cancels the setting change and returns to the item selection column. Note When "SP:HI" is selected, the power consumption is a little higher, compared with printing at the normal speed. VIDEO To select the video signal output from the VIDEO OUT connector on the rear panel VI:EE: Outputs the signal after it is processed by the printer. [VI:THR]: Outputs the signal directly without processing. BACK: Cancels the setting change and returns to the item selection column. BACK To exit menu mode Display this item and then press the jog dial. The unit exits the menu mode and "READY" is displayed on the LCD. a) The aspect ratio is as follows. When AS:4:3 is selected When AS:1:1 is selected b) The printing direction is as follows. When DI:NOR is selected When DI: REV is selected c) The range of the image to be printed is as follows. When SC:NOR is selected When SC:WD1 is selected When SC:WD2 is selected 39 Adjustments and Settings Using the Menu
-
 1
1 -
2
-
3
-
4
-
5
-
6
-
7
-
8
-
9
-
10
-
11
-
12
-
13
-
14
-
15
-
16
-
17
-
18
-
19
-
20
-
21
-
22
-
23
-
24
-
25
-
26
-
27
-
28
-
29
-
30
-
31
-
32
-
33
-
 34
34 -
 35
35 -
 36
36 -
 37
37 -
 38
38 -
 39
39 -
 40
40 -
 41
41 -
 42
42 -
 43
43 -
 44
44 -
45
-
46
-
47
-
48
-
49
-
50
-
51
-
52
-
53
-
54
-
55
-
56
-
57
-
58
-
59
-
60
-
61
-
62
-
63
-
64
-
65
-
66
-
67
-
68
-
69
-
70
-
71
-
72
-
73
-
74
-
75
-
76
-
77
-
78
-
79
-
80
-
81
-
82
-
83
-
84
-
85
-
86
-
87
-
88
-
89
-
90
-
91
-
92
-
93
-
94
-
95
-
96
-
97
-
98
-
99
-
100
-
101
-
102
-
103
-
104
-
105
-
106
-
107
-
108
-
109
-
110
-
111
-
112
-
113
-
114
-
115
-
116
-
117
-
118
-
119
-
120
-
121
-
122
-
123
-
124
-
125
-
126
-
127
-
128
-
129
-
130
-
131
-
132
-
133
-
134
-
135
-
136
-
137
-
138
-
139
-
140
-
141
-
142
-
143
-
144
-
145
-
146
-
147
-
148
-
149
-
150
-
151
-
152
-
153
-
154
-
155
-
156
-
157
-
158
-
159
-
160
 |
 |