Sony UP-897MD User Instructions - Page 44
Selecting the Printing Direction and Image Size, Selecting the printing direction - printers
 |
View all Sony UP-897MD manuals
Add to My Manuals
Save this manual to your list of manuals |
Page 44 highlights
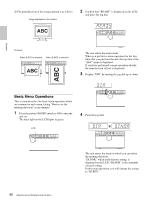
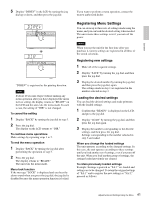
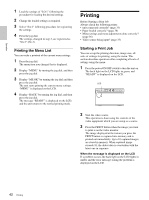
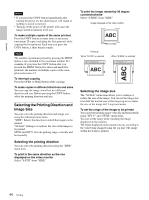
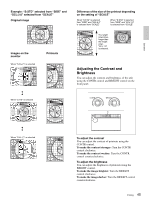
Operation Notes • If you press the COPY button immediately after turning the power on, the alarm buzzer will sound as nothing is stored in memory. • Turning off the power of the printer will cause the image stored in memory to be lost. To make multiple copies of the same printout Press the COPY button as many times as necessary (maximum 20 copies including the first printout) while copying the first printout. Each time you press the COPY button, a short buzzer sounds. Note The number of printouts printed by pressing the PRINT button is also included in the maximum number. For example, If you press the COPY button after you pressed the PRINT button five times and made five printouts, the number of multiple copies of the same printout becomes 15. To interrupt copying Press the OPEN or FEED button while copying. To make copies in different directions and sizes You can copy the image stored last in a different direction and size. Before pressing the COPY button, select the printing direction and size. Selecting the Printing Direction and Image Size You can select the printing direction and image size using the following menu items. "SIDE": Selects the direction in which the image is to be printed. "SCALE": Enlarges or reduces the size of the image to be printed. SFT.H and SFT.V: Sets the printing range vertically and horizontally. Selecting the printing direction You can select the printing direction using the "SIDE" menu item. To print in the same direction as the one displayed on the video monitor Select "S:STD" from "SIDE." To print the image rotated by 90 degree counterclockwise Select "S:SIDE" from "SIDE." Image displayed on the video monitor Printouts When "S:STD" is selected When "S:SIDE" is selected Selecting the image size The "SCALE" menu item allows you to enlarge or reduce the size of the image. You can set the image size from half the normal size of the image up to two times the size of the image in 0.1 step increments. To set the range of the image to be printed You can set the printing range vertically and horizontally using "SFT.V" and "SFT.H" menu items. You can set the range while watching the image displayed on the monitor. The frame displayed on the monitor moves according to the value being changed using the jog dial. The image within the frame is printed. 44 Printing
-
 1
1 -
2
-
3
-
4
-
5
-
6
-
7
-
8
-
9
-
10
-
11
-
12
-
13
-
14
-
15
-
16
-
17
-
18
-
19
-
20
-
21
-
22
-
23
-
24
-
25
-
26
-
27
-
28
-
29
-
30
-
31
-
32
-
33
-
34
-
35
-
36
-
37
-
38
-
 39
39 -
 40
40 -
 41
41 -
 42
42 -
 43
43 -
 44
44 -
 45
45 -
 46
46 -
 47
47 -
 48
48 -
 49
49 -
50
-
51
-
52
-
53
-
54
-
55
-
56
-
57
-
58
-
59
-
60
-
61
-
62
-
63
-
64
-
65
-
66
-
67
-
68
-
69
-
70
-
71
-
72
-
73
-
74
-
75
-
76
-
77
-
78
-
79
-
80
-
81
-
82
-
83
-
84
-
85
-
86
-
87
-
88
-
89
-
90
-
91
-
92
-
93
-
94
-
95
-
96
-
97
-
98
-
99
-
100
-
101
-
102
-
103
-
104
-
105
-
106
-
107
-
108
-
109
-
110
-
111
-
112
-
113
-
114
-
115
-
116
-
117
-
118
-
119
-
120
-
121
-
122
-
123
-
124
-
125
-
126
-
127
-
128
-
129
-
130
-
131
-
132
-
133
-
134
-
135
-
136
-
137
-
138
-
139
-
140
-
141
-
142
-
143
-
144
-
145
-
146
-
147
-
148
-
149
-
150
-
151
-
152
-
153
-
154
-
155
-
156
-
157
-
158
-
159
-
160
 |
 |