Sony UP-897MD User Instructions - Page 34
Loading Paper in the Unit, Loading Paper
 |
View all Sony UP-897MD manuals
Add to My Manuals
Save this manual to your list of manuals |
Page 34 highlights
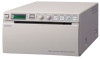
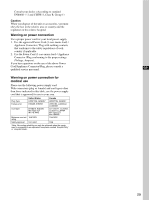
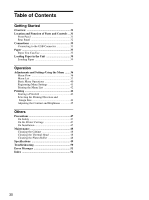
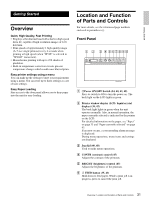
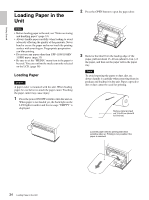
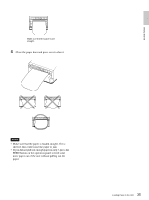
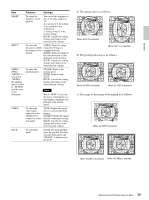
Getting Started Loading Paper in the Unit Notes • Before loading paper in the unit, see "Notes on storing and handling paper" (page 33). • Always handle paper carefully when loading to avoid adversely affecting the quality of the printouts. Never bend or crease the paper and never touch the printing surface with your fingers. Fingerprints perspiration can blur printing. • Do not use any paper other than UPP-110S/110HD/ 110HG paper. (page 33) • Be sure to set the "MEDIA" menu item to the paper to be used. You can confirm the media currently selected on the LCD. (page 38) Loading Paper Caution A paper cutter is mounted with the unit. When loading paper, be careful not to touch the paper cutter. Touching the paper cutter may cause injury. 1 Press the power ON/OFF switch to turn the unit on. When paper is not loaded yet, the back light on the LCD lights in umber and the message "EMPTY" is displayed. 2 Press the OPEN button to open the paper door. 3 Remove the label from the leading edge of the paper, pull out about 15~20 cm (about 6~8 in.) of the paper, and then set the paper roll in the paper tray. Note To avoid exposing the paper to dust, dirt, etc. always handle it carefully when removing from its package and loading it in the unit. Paper exposed to dirt or dust cannot be used for printing. Remove label and pull out 15 to 20 cm (about 6 to 8 inches). Load the paper with the printing side (heat sensitive side) up. Printing is not possible if the paper is reversed. 34 Loading Paper in the Unit
-
 1
1 -
2
-
3
-
4
-
5
-
6
-
7
-
8
-
9
-
10
-
11
-
12
-
13
-
14
-
15
-
16
-
17
-
18
-
19
-
20
-
21
-
22
-
23
-
24
-
25
-
26
-
27
-
28
-
 29
29 -
 30
30 -
 31
31 -
 32
32 -
 33
33 -
 34
34 -
 35
35 -
 36
36 -
 37
37 -
 38
38 -
 39
39 -
40
-
41
-
42
-
43
-
44
-
45
-
46
-
47
-
48
-
49
-
50
-
51
-
52
-
53
-
54
-
55
-
56
-
57
-
58
-
59
-
60
-
61
-
62
-
63
-
64
-
65
-
66
-
67
-
68
-
69
-
70
-
71
-
72
-
73
-
74
-
75
-
76
-
77
-
78
-
79
-
80
-
81
-
82
-
83
-
84
-
85
-
86
-
87
-
88
-
89
-
90
-
91
-
92
-
93
-
94
-
95
-
96
-
97
-
98
-
99
-
100
-
101
-
102
-
103
-
104
-
105
-
106
-
107
-
108
-
109
-
110
-
111
-
112
-
113
-
114
-
115
-
116
-
117
-
118
-
119
-
120
-
121
-
122
-
123
-
124
-
125
-
126
-
127
-
128
-
129
-
130
-
131
-
132
-
133
-
134
-
135
-
136
-
137
-
138
-
139
-
140
-
141
-
142
-
143
-
144
-
145
-
146
-
147
-
148
-
149
-
150
-
151
-
152
-
153
-
154
-
155
-
156
-
157
-
158
-
159
-
160
 |
 |