Sony WHG-SLK1i Operating Instructions - Page 29
Getting Started, If you make a mistake, To quit QUICK setup, To recall QUICK setup settings
 |
View all Sony WHG-SLK1i manuals
Add to My Manuals
Save this manual to your list of manuals |
Page 29 highlights
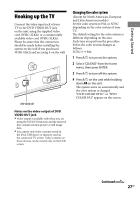
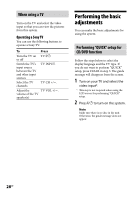
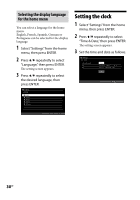
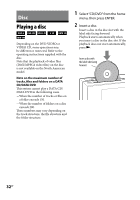
Getting Started 3 Select "CD/DVD" from the home menu, then press ENTER. The guide message appears at the bottom of the screen. 4 Press ENTER without inserting a disc. "LANGUAGE SETUP" appears. 5 Press or repeatedly to select a desired language, then press ENTER. The setting is selected and "VIDEO SETUP" appears. Tip Selected language is applied to the "OSD," "MENU" and "SUBTITLE" of the Control Menu (page 54). Note The selectable language is different depending on the area. 6 Press or repeatedly to select the setting that matches your TV type. If you have a 4:3 standard TV: Select "4:3 LETTER BOX" or "4:3 PAN SCAN" (page 55). If you have a wide-screen TV or a 4:3 standard TV with wide-screen mode: Select "16:9" (page 55). 7 Press ENTER. The setting is selected and "QUICK SETUP is complete." appears. The system is ready for playback. If you want to change each setting individually, see "Using the "SETUP" menu" (page 53). If you make a mistake Press , then select the item again. To quit "QUICK" setup Press DISPLAY. To recall "QUICK" setup settings 1 Press DISPLAY when playback is stopped. The Control Menu appears. 2 Press or repeatedly to select (SETUP), then press ENTER. 3 Press or repeatedly to select "QUICK," then press ENTER. Note The guide message appears at the bottom of the screen when you turn on the system for the first time or after performing "RESET" (page 96). Continued 29GB
-
 1
1 -
2
-
3
-
4
-
5
-
6
-
7
-
8
-
9
-
10
-
11
-
12
-
13
-
14
-
15
-
16
-
17
-
18
-
19
-
20
-
21
-
22
-
23
-
 24
24 -
 25
25 -
 26
26 -
 27
27 -
 28
28 -
 29
29 -
 30
30 -
 31
31 -
 32
32 -
 33
33 -
 34
34 -
35
-
36
-
37
-
38
-
39
-
40
-
41
-
42
-
43
-
44
-
45
-
46
-
47
-
48
-
49
-
50
-
51
-
52
-
53
-
54
-
55
-
56
-
57
-
58
-
59
-
60
-
61
-
62
-
63
-
64
-
65
-
66
-
67
-
68
-
69
-
70
-
71
-
72
-
73
-
74
-
75
-
76
-
77
-
78
-
79
-
80
-
81
-
82
-
83
-
84
-
85
-
86
-
87
-
88
-
89
-
90
-
91
-
92
-
93
-
94
-
95
-
96
-
97
-
98
-
99
-
100
-
101
-
102
-
103
-
104
-
105
-
106
-
107
-
108
-
109
-
110
-
111
-
112
-
113
-
114
-
115
-
116
-
117
-
118
-
119
-
120
-
121
-
122
-
123
-
124
-
125
-
126
-
127
 |
 |
