TP-Link Archer D20 Archer D20 V1 User Guide - Page 11
The Back Panel, The modem router's back panel shows the connection ports - vdsl
 |
View all TP-Link Archer D20 manuals
Add to My Manuals
Save this manual to your list of manuals |
Page 11 highlights
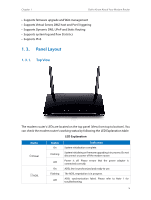
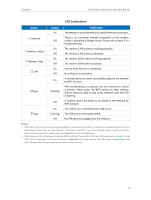
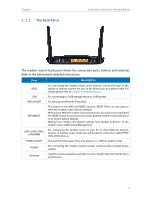
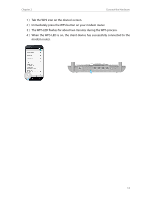
Chapter 1 1. 3. 2. The Back Panel Get to Know About Your Modem Router The modem router's back panel shows the connection ports, buttons and antennas. Refer to the following for detailed instructions. Item Description ADSL For connecting the modem router to the Internet. Connect the port to the splitter or directly connect the port to the phone jack via a phone cable. For details, please refer to Connect Your Modem Router. USB For connecting to a USB storage device or a USB printer. WiFi ON/OFF For turning on/off the Wi-Fi function. WPS/RESET The switch for the WPS and RESET function. RESET: There are two ways to reset the modem router's factory defaults. Method one: With the modem router powered on, use a pin to press and hold the RESET button for at least 8-10 seconds. And the modem router will reboot to its factory default settings. Method two: Restore the default settings from Backup & Restore of the modem router's Web-based Management. LAN1, LAN2, LAN3, LAN4/WAN For connecting the modem router to your PC or other Ethernet network devices. In wireless router mode you will be able to connect to Cable/FTTH/ VDSL/ADSL devices. POWER ON/OFF The switch for the power. Press it to power on or off the modem router. POWER For connecting the modem router to power socket via the provided power adapter. Antennas Used for wireless operation and data transmit. Upright them for the best Wi-Fi performance. 7
-
 1
1 -
2
-
3
-
4
-
5
-
 6
6 -
 7
7 -
 8
8 -
 9
9 -
 10
10 -
 11
11 -
 12
12 -
 13
13 -
 14
14 -
 15
15 -
 16
16 -
17
-
18
-
19
-
20
-
21
-
22
-
23
-
24
-
25
-
26
-
27
-
28
-
29
-
30
-
31
-
32
-
33
-
34
-
35
-
36
-
37
-
38
-
39
-
40
-
41
-
42
-
43
-
44
-
45
-
46
-
47
-
48
-
49
-
50
-
51
-
52
-
53
-
54
-
55
-
56
-
57
-
58
-
59
-
60
-
61
-
62
-
63
-
64
-
65
-
66
-
67
-
68
-
69
-
70
-
71
-
72
-
73
-
74
-
75
-
76
-
77
-
78
-
79
-
80
-
81
-
82
-
83
-
84
-
85
-
86
-
87
-
88
-
89
-
90
-
91
-
92
-
93
-
94
-
95
-
96
-
97
-
98
-
99
-
100
-
101
-
102
-
103
-
104
-
105
-
106
-
107
-
108
-
109
-
110
-
111
-
112
-
113
-
114
-
115
-
116
-
117
-
118
 |
 |
