TP-Link TD-VG3511 TD-VG3511 V1 User Guide - Page 99
ARP List, Enable/ Disable Selected
 |
View all TP-Link TD-VG3511 manuals
Add to My Manuals
Save this manual to your list of manuals |
Page 99 highlights
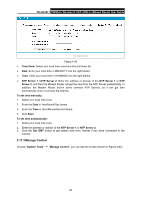
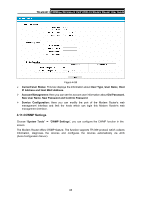
TD-VG3511 150Mbps Wireless N VoIP ADSL2+ Modem Router User Guide ¾ Bound: Check this option to enable ARP binding for a specific device. ¾ Edit: To modify or delete an existing entry. When you want to add or modify an IP & MAC Binding entry, you can click the Add New button or Edit button, and then you will go to the next page. This page is used for adding or modifying an IP & MAC Binding entry (shown in Figure 4-87). Figure 4-87 To add IP & MAC Binding entries, follow the steps below. 1. Click the Add New button as shown in Figure 4-86. 2. Enter the MAC Address and IP Address. 3. Select the Bind checkbox. 4. Click the Save button to save it. To modify or delete an existing entry, follow the steps below. 1. Find the desired entry in the table. 2. Click Edit as desired on the Edit column. Click the Enable/ Disable Selected button to make selected entries enabled or disabled. Click the Delete Selected button to delete selected entries. 4.14.2 ARP List To manage the computer, you could observe the computers in the LAN by checking the relationship of MAC address and IP address on the ARP list, and you could also configure the items on the ARP list. This page displays the ARP List; it shows all the existing IP & MAC Binding entries (shown in Figure 4-88). Figure 4-88 ¾ MAC Address: The MAC address of the controlled computer in the LAN. 90
-
 1
1 -
2
-
3
-
4
-
5
-
6
-
7
-
8
-
9
-
10
-
11
-
12
-
13
-
14
-
15
-
16
-
17
-
18
-
19
-
20
-
21
-
22
-
23
-
24
-
25
-
26
-
27
-
28
-
29
-
30
-
31
-
32
-
33
-
34
-
35
-
36
-
37
-
38
-
39
-
40
-
41
-
42
-
43
-
44
-
45
-
46
-
47
-
48
-
49
-
50
-
51
-
52
-
53
-
54
-
55
-
56
-
57
-
58
-
59
-
60
-
61
-
62
-
63
-
64
-
65
-
66
-
67
-
68
-
69
-
70
-
71
-
72
-
73
-
74
-
75
-
76
-
77
-
78
-
79
-
80
-
81
-
82
-
83
-
84
-
85
-
86
-
87
-
88
-
89
-
90
-
91
-
92
-
93
-
 94
94 -
 95
95 -
 96
96 -
 97
97 -
 98
98 -
 99
99 -
 100
100 -
 101
101 -
 102
102 -
 103
103 -
 104
104 -
105
-
106
-
107
-
108
-
109
-
110
-
111
-
112
-
113
-
114
-
115
-
116
-
117
-
118
-
119
-
120
-
121
-
122
-
123
-
124
-
125
-
126
-
127
 |
 |
