TP-Link TL-SC3230N TL-SC3230N V1 User Guide - Page 14
Hardware Installation, Fix it by, Screws, Ethernet, Cable
 |
View all TP-Link TL-SC3230N manuals
Add to My Manuals
Save this manual to your list of manuals |
Page 14 highlights
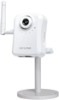
Chapter 3 Hardware Installation Follow the steps below to mount your camera. 1. Attach the camera with the included stand 2. Place the camera on the table or fix it onto ceiling or wall Use three screws to fix the camera onto the ceiling or wall. You could also put the camera on the table directly. Fix it by Screws 3. Plug an Ethernet cable into the camera Connect an Ethernet cable to the LAN port located on the camera's bottom and attach it to the network. Ethernet Cable 6
-
 1
1 -
2
-
3
-
4
-
5
-
6
-
7
-
8
-
 9
9 -
 10
10 -
 11
11 -
 12
12 -
 13
13 -
 14
14 -
 15
15 -
 16
16 -
 17
17 -
 18
18 -
 19
19 -
20
-
21
-
22
-
23
-
24
-
25
-
26
-
27
-
28
-
29
-
30
-
31
-
32
-
33
-
34
-
35
-
36
-
37
-
38
-
39
-
40
-
41
-
42
-
43
-
44
-
45
-
46
-
47
-
48
-
49
-
50
-
51
-
52
-
53
-
54
-
55
-
56
-
57
-
58
-
59
-
60
-
61
-
62
-
63
-
64
-
65
-
66
-
67
-
68
-
69
-
70
-
71
-
72
-
73
-
74
-
75
-
76
-
77
-
78
-
79
-
80
-
81
-
82
-
83
-
84
-
85
-
86
-
87
-
88
-
89
-
90
-
91
-
92
-
93
-
94
 |
 |

6
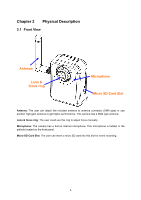
Chapter 3
Hardware Installation
Follow the steps below to mount your camera.
1.
Attach the camera with the included stand
2.
Place the camera on the table or fix it onto ceiling or wall
Use three screws to fix the camera onto the ceiling or wall. You could also put the camera on
the table directly.
3.
Plug an Ethernet cable into the camera
Connect an Ethernet cable to the LAN port located on the camera
’
s bottom and attach it to
the network.
Fix it by
Screws
Ethernet
Cable