TP-Link TL-WDN3200 TL-WDN3200 V1 User Guide - Page 33
Security Key, Network Type - windows 10
 |
View all TP-Link TL-WDN3200 manuals
Add to My Manuals
Save this manual to your list of manuals |
Page 33 highlights
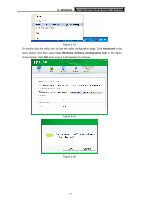
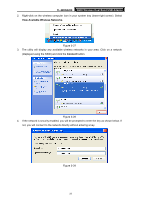
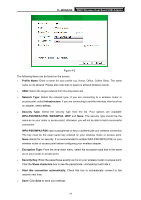
TL-WDN3200 N600 Wireless Dual Band USB Adapter ¾ Network Type: Select the network type. If you are connecting to a wireless router or access point, select Infrastructure. If you are connecting to another wireless client such as an adapter, select ad hoc. ¾ Band: This item determines which operating frequency will be used. Two options are available: 2.4Ghz and 5Ghz. It is recommended that your computers and devices running video and voice applications use the 5Ghz band, while your guest access and computers that are only browsing the web use the 2.4Ghz band. z 2.4Ghz - You can use the 2.4GHz band to connect to many classic wireless devices like gaming consoles, laptops, DVRs, ect. z 5Ghz - This band is less crowded and is used for time-sensitive music, video streaming or gaming. Using this band can avoid interference with 2.4GHz networks or noisy devices like cordless phones and microwave ovens. ¾ Security Type: Select the security type from the list. Two options are available: WEP and None. None stands for no security. It is recommended that you select WEP to secure your wireless network. ¾ Encryption Type: If you select None as the Security Type, the Encryption Type will be None accordingly. If you select WEP as the Security Type, the Encryption Type will be Open. ¾ Key Index: You can select ASCII or Hexadecimal format on the right. ASCII format stands for any combination of keyboard characters in the specified length. Hexadecimal format stands for any combination of hexadecimal digits (0-9, a-f, A-F) in the specified length. • For 64-bit encryption - You can enter 10 hexadecimal digits (any combination of 0-9, a-f, A-F, zero key is not permitted) or 5 ASCII characters. • For 128-bit encryption - You can enter 26 hexadecimal digits (any combination of 0-9, a-f, A-F, zero key is not permitted) or 13 ASCII characters. ¾ Security Key: Enter the passphrase. Click the Show characters box to see the passphrase. Unchecking it will hide it. ¾ Start this connection automatically: Check this box to automatically connect to this network next time. ¾ Save: Click Save to save your settings. Complete the above settings, the Profile page should looks like the following figure. To connect to a desired network, just highlight the network you would like to connect to and click the Connect button on the bottom of the window. 26
-
 1
1 -
2
-
3
-
4
-
5
-
6
-
7
-
8
-
9
-
10
-
11
-
12
-
13
-
14
-
15
-
16
-
17
-
18
-
19
-
20
-
21
-
22
-
23
-
24
-
25
-
26
-
27
-
 28
28 -
 29
29 -
 30
30 -
 31
31 -
 32
32 -
 33
33 -
 34
34 -
 35
35 -
 36
36 -
 37
37 -
 38
38 -
39
-
40
-
41
-
42
-
43
-
44
-
45
 |
 |