Toshiba 32PS10 Owners Manual - Page 14
Selecting the video input source to view, Channel List
 |
View all Toshiba 32PS10 manuals
Add to My Manuals
Save this manual to your list of manuals |
Page 14 highlights
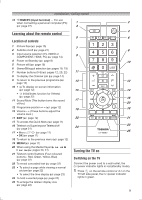
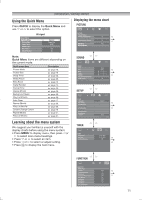
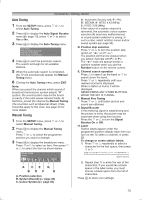
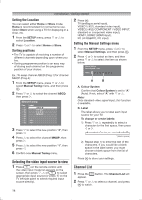
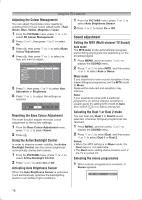
Introduction / Getting started Setting the Location You can select either Home or Store mode. Home is recommended for normal home use. Select Store when using a TV for displaying in a shop, etc. 1 From the SETUP menu, press or to select Location. 2 Press or to select Home or Store. Sorting positions • The TV is capable of receiving a number of different channels depending upon where you live. • Sorting programme position is an easy way of storing each channel on the programme position of your choice. Ex.: To swap channel ABCD (Prog.1) for channel MNOP (Prog.4): 1 From the SETUP menu, press or to select Manual Tuning menu, and then press Q. 2 Press or to select the channel ABCD, then press . Manual Tuning Pos. 1 2 3 4 5 6 7 8 Label ABCD EFGH IJKL MNOP 3 Press to select the new position "4", then press . 4 Press to select the channel MNOP, then press . 5 Press to select the new position "1", then press . 6 Confirm new Manual Tuning menu. Selecting the video input source to view 1 Press on the remote control until the video input mode list appears on the screen, then press , or to select appropriate input source (or press o on the TV left side panel to select required input source directly). 2 Press Q. TV (analogue aerial input), VIDEO1 (o(1), standard video input), VIDEO2 (o(2) COMPONENT / VIDEO INPUT, standard or component video input), HDMI1, HDMI2 (HDMI input), PC (o RGB/PC, PC input) Setting the Manual Settings menu 1 From the SETUP menu, press or to select Manual Settings, and then press Q. 2 Press or to select an item, and then press or to select the item as shown below. Manual Settings Colour System : Auto VIDEO A A B A. Colour System Confirm that Colour System is set to "A" (Auto). If not, select "A" with or . Note: Only standard video signal input, this function is available. B. Label The label allows you to label each input source for your TV. To change or create labels: 1) Press or repeatedly to select a character for the first space, then press or . *(blank space) 2) Repeat step 1) to enter the rest of the characters. If you would like a blank space in the label name, you must choose a blank space from the list of characters. Press Q to store your settings. Channel List 1 Press the appear. button. The Channel List will 2 Press or to select a channel, and press Q to watch. 14
-
 1
1 -
2
-
3
-
4
-
5
-
6
-
7
-
8
-
 9
9 -
 10
10 -
 11
11 -
 12
12 -
 13
13 -
 14
14 -
 15
15 -
 16
16 -
 17
17 -
 18
18 -
 19
19 -
20
-
21
-
22
-
23
-
24
-
25
-
26
-
27
-
28
-
29
-
30
-
31
-
32
-
33
-
34
-
35
-
36
-
37
-
38
 |
 |
