Toshiba 32PS10 Owners Manual - Page 28
Using the PC Settings, Using the Media Player
 |
View all Toshiba 32PS10 manuals
Add to My Manuals
Save this manual to your list of manuals |
Page 28 highlights
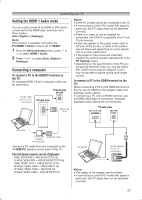
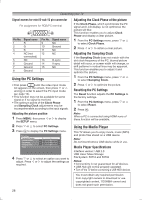
Connecting your TV Signal names for mini D-sub 15 pin connector Pin assignment for RGB/PC terminal Pin No. 1 2 3 4 5 6 7 8 Signal name R G B NC (not connected) NC Ground Ground Ground Pin No. 9 10 11 12 Signal name NC Ground NC NC 13 H-sync 14 V-sync 15 NC Using the PC Settings • First press until the video input mode list appears on the screen, then press or and Q in order to select the PC input mode (- page 14). • This function may not be available for some signal or if no signal is received. • The optimum points of the Clock Phase and Sampling Clock adjustments may be incomprehensible according to the input signals. Adjusting the picture position 1 Press MENU, then press or to display the SETUP menu. 2 Press or to select PC Settings. 3 Press Q to display the PC Settings menu. PC Settings Horizontal Position 0 Vertical Position 0 Clock Phase 0 Sampling Clock 0 Reset 4 Press or to select an option you want to adjust. Press or to adjust the settings as required. Adjusting the Clock Phase of the picture If the Clock Phase, which synchronize the PC signal and LCD display, is not optimized, the picture will blur. This function enables you to adjust Clock Phase and display a clear picture. 1 From the PC Settings menu, press or to select Clock Phase. 2 Press or to obtain a clear picture. Adjusting the Sampling Clock If the Sampling Clock does not match with the dot clock frequency of the PC, blurred picture detail will occur, or screen width will change, or drift patterns in vertical lines may be apparent. This function enables you to adjust it and optimize the picture. 1 From the PC Settings menu, press or to select Sampling Clock. 2 Press or to optimize the picture. Resetting the PC Settings The Reset function adjusts the PC Settings to the factory settings. 1 From the PC Settings menu, press or to select Reset. 2 Press Q. Note: When a PC is connected using HDMI none of these function will be available. Using the Media Player This TV allows you to enjoy movie, music (MP3) and photo files stored on a USB device Note: Do not insert/remove USB device while in use. Media Player Specifications Interface version: USB 2.0 USB class: Mass Storage File System: FAT16 and FAT32 Notes: • Connectivity is not guaranteed for all devices. • USB Hub will not be properly operated. • Turn off the TV before connecting a USB HDD devices. You must obtain any required permission from copyright owners to download or use copyrighted content. TOSHIBA cannot and does not grant such permission. 28
-
 1
1 -
2
-
3
-
4
-
5
-
6
-
7
-
8
-
9
-
10
-
11
-
12
-
13
-
14
-
15
-
16
-
17
-
18
-
19
-
20
-
21
-
22
-
 23
23 -
 24
24 -
 25
25 -
 26
26 -
 27
27 -
 28
28 -
 29
29 -
 30
30 -
 31
31 -
 32
32 -
 33
33 -
34
-
35
-
36
-
37
-
38
 |
 |
