Toshiba 32PS10 Owners Manual - Page 29
Closing the Media Player, Multi View, Single View, Setting the Auto Start, Auto Start, Manual Start
 |
View all Toshiba 32PS10 manuals
Add to My Manuals
Save this manual to your list of manuals |
Page 29 highlights
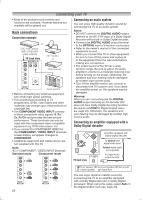
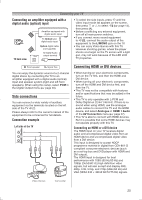
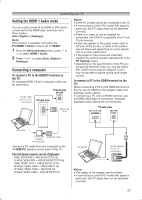
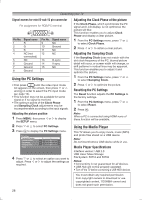
Connecting your TV Basic operation When Auto Start is enabled, you will be asked if you want to start the Media Player whenever a USB device is inserted. If Auto Start is disabled, you must manually start the Media Player from the menu. Setting the Auto Start: 1 From the FUNCTION menu, press or to select Media Player, and then press Q. 2 Press or to select Setup, and press Q. 3 Press or to select Auto Start, and then press or to select On or Off. Setup Auto Start On DivX® VOD Registration DivX® VOD Deactivation Auto Start: 1 Insert USB device into the USB socket on the left side of the TV. A prompt will appear. 2 Press or to select Yes, and then press Q. 3 Press or to select Photo, Movie or Music and press Q. The thumbnail view will appear. Note: If Auto Start is set to Off, you can start the Media Player manually. Manual Start: 1 Insert USB device into the USB socket on the left side of the TV. 2 From the Media Player menu, and then press Q. 3 Press or to select Photo, Movie or Music and press Q. The thumbnail (for Photo) or list files (for Movie and Music) will appear. Media Player Photo Movie Music Setup Selecting a file in the list of contents: 1 Press or to select a file or folder. 2 Press Q to move to the next layer, or select Up Folder to return to the previous layer. Closing the Media Player: 1 Press EXIT. Viewing photo files There are three types of viewing modes. Multi View This view allows you to search for photos in a grid format. The pictures are displayed using thumbnail data in each image file. /C:Folder/ 1/6 Return photo photo_2 photo_20110107.jpg photo_20110107.jpg photo_20110107.jpg photo_20110107.jpg photo_20110107.jpg photo_20110107.jpg photo_20110107.jpg photo_20110107.jpg photo_20110107.jpg OK Select QUICK Features P Page RETURN Back The initial highlighted position will be on the top left thumbnail in the Multi View. 1 Press or to move the highlight in one window. If all of the photos will not fit in one screen, when pressing at the top left thumbnail, the screen will move to the previous page. Conversely, when pressing at the bottom right thumbnail, the screen will move to the next page. PU / Pu buttons can be used to page up/ down the photo list when there are more photos than will fit onto one screen. 2 When you select a folder, press Q to move to the next layer. Select Up Folder to move back to the previous layer. 3 Press Q to view the selected photo in Single View mode. Single View In this mode, only files located in the selected directory will be displayed. This view allows you to change the photo content manually. When moving from Multi View to Single View, the currently selected photo will be displayed. 1 Press to view the next photo. Press to view the previous photo. 2 Press to rotate the image 90° clockwise. Press to rotate the image 90° counterclockwise. 29
-
 1
1 -
2
-
3
-
4
-
5
-
6
-
7
-
8
-
9
-
10
-
11
-
12
-
13
-
14
-
15
-
16
-
17
-
18
-
19
-
20
-
21
-
22
-
23
-
 24
24 -
 25
25 -
 26
26 -
 27
27 -
 28
28 -
 29
29 -
 30
30 -
 31
31 -
 32
32 -
 33
33 -
 34
34 -
35
-
36
-
37
-
38
 |
 |