Toshiba Satellite A110 Maintenance Manual - Page 46
Procedure 1, External display check, Diagnostic check, 4 Display Troubleshooting - turns no boot
 |
View all Toshiba Satellite A110 manuals
Add to My Manuals
Save this manual to your list of manuals |
Page 46 highlights
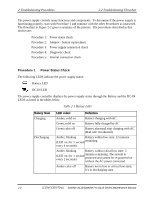
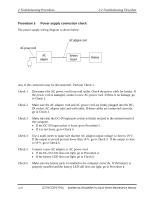
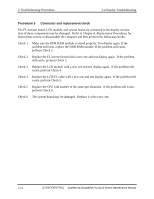
2.4 Display Troubleshooting 2 Troubleshooting Procedures This section describes how to determine if the computer's display is functioning properly. The process is outlined in Figure 2-3. Start with Procedure 1 and continue with the other procedures as instructed. Procedure 1: External display check Procedure 2: Diagnostic check Procedure 3: Connector and replacement check Procedure 1 External display check Connect an external display to the computer's external monitor port, then boot the computer. The computer automatically detects the external display. If the external display works correctly, the internal LCD may be damaged. Go to Procedure 3. If the external monitor appears to have the same problem as the internal monitor, the system board may be damaged. Go to Procedure 2. Procedure 2 Diagnostic check The Display Test program is stored on the computer's Diagnostics disk. This program checks the display controller on the system board. Insert the Diagnostics disk in the computer's floppy disk drive, turn on the computer and run the test. Refer to Chapter 3, Tests and Diagnostics for details. If an error is detected, go to Procedure 3. If an error is not detected, the display is functioning properly. Satellite A110 /Satellite Pro A110 Series Maintenance Manual [CONFIDENTIAL] 2-13
-
 1
1 -
2
-
3
-
4
-
5
-
6
-
7
-
8
-
9
-
10
-
11
-
12
-
13
-
14
-
15
-
16
-
17
-
18
-
19
-
20
-
21
-
22
-
23
-
24
-
25
-
26
-
27
-
28
-
29
-
30
-
31
-
32
-
33
-
34
-
35
-
36
-
37
-
38
-
39
-
40
-
 41
41 -
 42
42 -
 43
43 -
 44
44 -
 45
45 -
 46
46 -
 47
47 -
 48
48 -
 49
49 -
 50
50 -
 51
51 -
52
-
53
-
54
-
55
-
56
-
57
-
58
-
59
-
60
-
61
-
62
-
63
-
64
-
65
-
66
-
67
-
68
-
69
-
70
-
71
-
72
-
73
-
74
-
75
-
76
-
77
-
78
-
79
-
80
-
81
-
82
-
83
-
84
-
85
-
86
-
87
-
88
-
89
-
90
-
91
-
92
-
93
-
94
-
95
-
96
-
97
-
98
-
99
-
100
-
101
-
102
-
103
-
104
-
105
-
106
-
107
-
108
-
109
-
110
-
111
-
112
-
113
-
114
-
115
-
116
-
117
-
118
-
119
-
120
-
121
-
122
-
123
-
124
-
125
-
126
-
127
-
128
-
129
-
130
-
131
-
132
-
133
-
134
-
135
-
136
-
137
-
138
-
139
-
140
-
141
-
142
-
143
 |
 |
