Toshiba Satellite Pro S850 PSSESC-003001 Users Manual Canada; English - Page 93
Disconnecting an eSATA device, Serial port, Security lock
 |
View all Toshiba Satellite Pro S850 PSSESC-003001 manuals
Add to My Manuals
Save this manual to your list of manuals |
Page 93 highlights
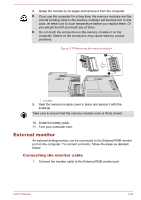
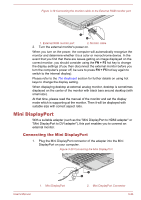
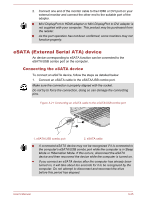
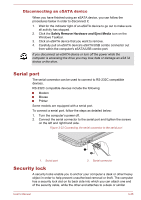
Disconnecting an eSATA device When you have finished using an eSATA device, you can follow the procedures below in order to disconnect it: 1. Wait for the indicator light of an eSATA device to go out to make sure all activity has stopped. 2. Click the Safely Remove Hardware and Eject Media icon on the Windows Taskbar. 3. Click an eSATA device that you want to remove. 4. Carefully pull an eSATA device's eSATA/USB combo connector out from within the computer's eSATA/USB combo port. If you disconnect an eSATA device or turn off the power while the computer is accessing the drive you may lose data or damage an eSATA device or the drive. Serial port The serial connector can be used to connect to RS-232C compatible devices. RS-232C compatible devices include the following: Modem Mouse Printer Some models are equipped with a serial port. To connect a serial port, follow the steps as detailed below: 1. Turn the computer's power off. 2. Connect the serial connector to the serial port and tighten the screws on the left and right hand side. Figure 3-22 Connecting the serial connector to the serial port 1 2 1. Serial port 2. Serial connector Security lock A security locks enable you to anchor your computer a desk or other heavy object in order to help prevent unauthorized removal or theft. The computer has a security lock slot on its back side into which you can attach one end of the security cable, while the other end attaches to a desk or similar User's Manual 3-46
-
 1
1 -
2
-
3
-
4
-
5
-
6
-
7
-
8
-
9
-
10
-
11
-
12
-
13
-
14
-
15
-
16
-
17
-
18
-
19
-
20
-
21
-
22
-
23
-
24
-
25
-
26
-
27
-
28
-
29
-
30
-
31
-
32
-
33
-
34
-
35
-
36
-
37
-
38
-
39
-
40
-
41
-
42
-
43
-
44
-
45
-
46
-
47
-
48
-
49
-
50
-
51
-
52
-
53
-
54
-
55
-
56
-
57
-
58
-
59
-
60
-
61
-
62
-
63
-
64
-
65
-
66
-
67
-
68
-
69
-
70
-
71
-
72
-
73
-
74
-
75
-
76
-
77
-
78
-
79
-
80
-
81
-
82
-
83
-
84
-
85
-
86
-
87
-
 88
88 -
 89
89 -
 90
90 -
 91
91 -
 92
92 -
 93
93 -
 94
94 -
 95
95 -
 96
96 -
 97
97 -
 98
98 -
99
-
100
-
101
-
102
-
103
-
104
-
105
-
106
-
107
-
108
-
109
-
110
-
111
-
112
-
113
-
114
-
115
-
116
-
117
-
118
-
119
-
120
-
121
-
122
-
123
-
124
-
125
-
126
-
127
-
128
-
129
-
130
-
131
-
132
-
133
-
134
-
135
-
136
-
137
-
138
-
139
-
140
-
141
-
142
-
143
-
144
-
145
-
146
-
147
-
148
-
149
-
150
-
151
-
152
-
153
-
154
-
155
-
156
-
157
-
158
-
159
-
160
-
161
-
162
-
163
-
164
-
165
-
166
-
167
-
168
-
169
-
170
-
171
-
172
-
173
-
174
-
175
-
176
-
177
-
178
-
179
-
180
-
181
-
182
-
183
-
184
 |
 |