Troy-Bilt Horse Tiller Operation Manual - Page 16
Stopping Forward Motion & Tines, Moving in Reverse, Stopping Reverse Motion, Turning the Tiller - tines stopped
 |
View all Troy-Bilt Horse Tiller manuals
Add to My Manuals
Save this manual to your list of manuals |
Page 16 highlights
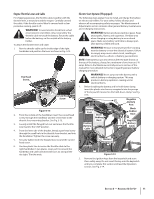
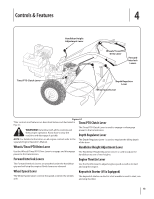
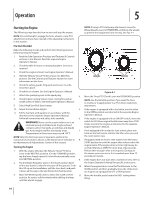
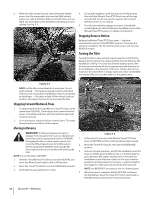
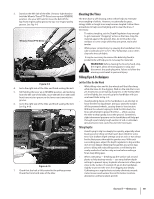
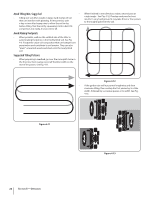
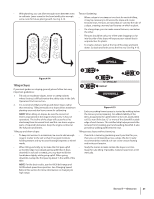
6. When the tiller moves forward, relax and let the wheels 4. Lift up the handlebars until the tines are off the ground, power the tiller along while the tines dig. Walk behind then shift the Wheels/Tines/PTO Drive Lever all the way and to one side of the tiller. Walk on the side that is not yet up and hold. You do not need to squeeze the Forward tilled. Use a firm grip on the handlebars but keep your arm Interlock Levers to use reverse. relaxed. See Fig. 4-3. 5. The tiller immediately engages in reverse. Periodically check behind you while holding the handlebars up and the Wheels/Tines/PTO Lever in its upper-most position. Stopping Reverse Motion Release the Wheels/Tines/PTO Drive Lever - the lever automatically returns to the NEUTRAL position. This stops the wheels immediately. The Forward Interlock Levers will not stop REVERSE motion. Turning the Tiller Turning the tiller is easy and just requires practice. First find the balance point between the engine and the tines by lifting up the handlebars. See Fig. 4-4. Once you find the balance point, then let the powered wheels do the turning as you push sideways on the handlebars in the direction of the turn. Practice the turning maneuver described here in a large open area. Once comfortable turning the tiller, you can then take it to the garden area. Figure 4-3 NOTE: Let the tiller move ahead at its own pace. Do not push it ahead - this reduces operator control and tilling efficiency. Do not push the handlebars down in an attempt to dig deeper - this takes weight off the wheels, reduces traction, and causes the tines to try to propel the tiller. Stopping Forward Motion & Tines 1. To stop forward motion, tap Wheels/Tines/PTO Drive Lever upward into NEUTRAL. Then release the Forward Interlock Levers. The wheels and tines will stop and the engine will continue running. 2. In an emergency, release all of the control levers. This stops forward motion and shuts-off the engine. Moving in Reverse WARNING! To help avoid personal injury or damage to the equipment be sure no obstacles are behind you before operating the tiller in REVERSE. 1. Disengage the tines, reduce engine speed, and move the Wheel Speed Lever to SLOW position 2. before operating in REVERSE. Avoid using FAST wheel speed until you are familiar with backing the tiller. 3. NOTE: Do not till while in REVERSE. 1. Shift the Tines/Wheels/PTO Drive Lever into NEUTRAL and move the Wheel Speed Lever to the SLOW position. 2. Move the Tines/PTO Clutch Lever into DISENGAGE position. 3. Verify that the area behind you is clear. 4. Figure 4-4 At the end of a row, move the Wheels/Tines/PTO Drive Lever to NEUTRAL position and reduce the engine speed. Move the Tines/PTO Clutch Lever into the DISENGAGE position. Resume forward operation, and lift the handlebars until the tines are off the ground. Refer to Fig. 4-4. Find the balance point between the engine and the tines. Then push the handlebars in the direction of the turn. Be very careful to keep feet and legs away from the tines - which should be disengaged. Let the powered wheels do the hard work. NOTE: Use REVERSE if necessary to turn in a limited space. When the turn is complete, shift to NEUTRAL and lower the handlebars. Move the Tines/PTO Clutch Lever back to ENGAGE position and resume forward operation. 16 Section 5- Operation
-
 1
1 -
2
-
3
-
4
-
5
-
6
-
7
-
8
-
9
-
10
-
 11
11 -
 12
12 -
 13
13 -
 14
14 -
 15
15 -
 16
16 -
 17
17 -
 18
18 -
 19
19 -
 20
20 -
 21
21 -
22
-
23
-
24
-
25
-
26
-
27
-
28
-
29
-
30
-
31
-
32
-
33
-
34
-
35
-
36
-
37
-
38
-
39
-
40
-
41
-
42
-
43
-
44
 |
 |
