Troy-Bilt Horse Tiller Operation Manual - Page 9
Wheels/Tines PTO Drive Lever - wheel removal
 |
View all Troy-Bilt Horse Tiller manuals
Add to My Manuals
Save this manual to your list of manuals |
Page 9 highlights
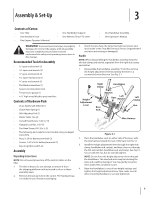
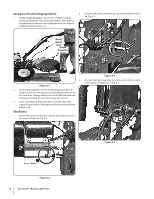
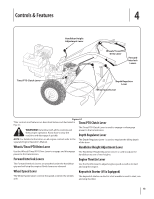
Wheels/Tines PTO Drive Lever 1. Loosen the bolt on the handlebar base and swing the handlebars out to the right side. See Fig. 3-1. 4. Align the rear most holes of the yoke plates and the Wheels/Tines PTO Lever. Use long nose pliers to hold the bushing in place while inserting the screw through the lever and yoke plates. See Fig. 3-8. Install the star washer 2. Remove both sets of nuts, star washers, screws, and one and the nut then hand tighten. bushing from the yoke plates. See Fig. 3-6. There is a bushing inside the short link. Be careful not to lose it when removing screw. Bushing Bushing Yoke Plates Screw Screw Star Washer Nut Star Washers Nut Long Link Short Link Figure 3-6 3. Slide the plates at the end of the Wheels/Tines/PTO Lever over the yoke plates. See Fig. 3-7. To aid in the next step, insert a screw temporarily into the forward most holes of the yoke plates and the lever. Wheels/Tines/PTO Drive Lever Plates Wheel Speed Lever Forward Hole Figure 3-8 5. Retrieve the clutch pawl spring from hardware bag. Remove the temporary screw from the forward holes inserted in Step 3 and move the Wheels/Tines/PTO Lever fully forward. Install the wider hook end of the clutch pawl spring down into the small hole at the end of the handle. Use pliers to insert the other end into the hole in the long link bar. See Fig. 3-9. Clutch Pawl Spring Long Link Bar Figure 3-7 Figure 3-9 NOTE: Do not bend or over stretch the spring while installing. Section 3 - Assembly & Set-Up 9
-
 1
1 -
2
-
3
-
 4
4 -
 5
5 -
 6
6 -
 7
7 -
 8
8 -
 9
9 -
 10
10 -
 11
11 -
 12
12 -
 13
13 -
 14
14 -
15
-
16
-
17
-
18
-
19
-
20
-
21
-
22
-
23
-
24
-
25
-
26
-
27
-
28
-
29
-
30
-
31
-
32
-
33
-
34
-
35
-
36
-
37
-
38
-
39
-
40
-
41
-
42
-
43
-
44
 |
 |
