Troy-Bilt Horse Tiller Operation Manual - Page 27
Battery, Tine Shaft, Wheel Shaft Maintenance, Hardware - old
 |
View all Troy-Bilt Horse Tiller manuals
Add to My Manuals
Save this manual to your list of manuals |
Page 27 highlights
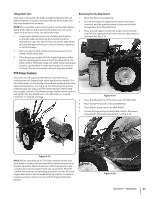
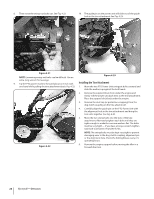
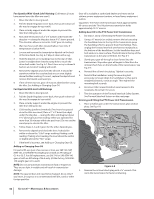
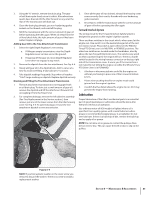
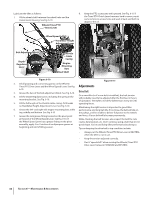
Battery WARNING! When removing the battery, always disconnect the negative (-) cable first followed by the positive (+) cable. Reverse this procedure when reinstalling the battery. The battery is sealed and is maintenance free. Acid levels cannot be checked. • Always keep the battery cables and terminals clean and free of corrosive build-up. • After cleaning the battery and terminals, apply a light coat of petroleum jelly or grease to the terminals and cover both terminals with the rubber boots. Tine Shaft After every 10 operating hours, remove the left- and right-side Bolo Tine holders and clear away dirt and debris that have accumulated on the tine shaft or inside the tine holders. Please follow this maintenance recommendation, as debris can cause premature wear to the tine shaft and its oil seals. Refer to the previous tine holder removal instructions. After cleaning away any debris and removing old grease from the tine shaft, apply fresh grease to the tine shaft. Wheel Shaft Maintenance After every 10 operating hours, remove the wheels and clear away dirt and debris that has accumulated on the wheel shaft Please follow this maintenance recommendation, as debris can cause premature wear to the wheel shaft and its oil seals. 1. Prop the transmission up with a sturdy block to raise the wheels off the ground. 2. Remove the wheels by removing the hex bolt and lock nut which secures each to the wheel shaft. 3. After cleaning away any debris and removing old grease, apply fresh grease to the wheel shaft before re-installing the wheels. Hardware Check for loose or missing hardware every ten (10) operating hours. Failure to tighten or replace fasteners can cause poor performance, equipment damage or oil leakage. Most hardware on your tiller is visible. Pay particular attention to hardware listed below. Transmission Pulley Mounting Bolt • If the washer behind the bolt head is loose, the bolt needs tightening. To do this, first insert a punch or thick screwdriver into the hole next to the bolt and wedge the tool against the side of the motor mount casting. This immobilizes the pulley while you tighten the bolt. See Fig. 6-1. Mounting Bolt Figure 6-1 Neutral Plunger Assembly Jam Nut • The jam nut is located on the left side of the neutral plunger. If loose, immobilize bolt head with one wrench and use another wrench to tighten the nut. See Fig. 6-2. Jam Nut Figure 6-2 Section 6 - Maintenance & Adjustments 27
-
 1
1 -
2
-
3
-
4
-
5
-
6
-
7
-
8
-
9
-
10
-
11
-
12
-
13
-
14
-
15
-
16
-
17
-
18
-
19
-
20
-
21
-
 22
22 -
 23
23 -
 24
24 -
 25
25 -
 26
26 -
 27
27 -
 28
28 -
 29
29 -
 30
30 -
 31
31 -
 32
32 -
33
-
34
-
35
-
36
-
37
-
38
-
39
-
40
-
41
-
42
-
43
-
44
 |
 |
