Troy-Bilt Horse Tiller Operation Manual - Page 38
Service - belt replacement
 |
View all Troy-Bilt Horse Tiller manuals
Add to My Manuals
Save this manual to your list of manuals |
Page 38 highlights
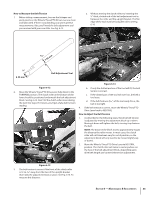
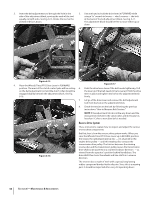
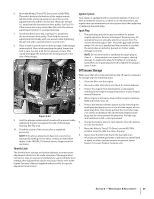
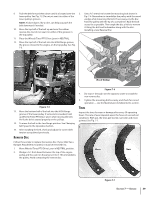
Service 7 Belt Replacement Drive Belt 5. Lift the top half of the belt up and over the upper pulley and the rubber reverse disc, moving it in front of the reverse disc. See Fig. 7-3. 1. Move the Wheels/Tines/PTO Drive Lever to NEUTRAL position. 2. While kneeling on the right side of the tiller, create slack in the belt by reaching over to the left side of the pulleys and pushing in on the center of the belt with your finger. 3. Use your right hand to move the belt down and away from the lower pulley, in the direction of the engine. See Fig. 7-1. Drive Belt Lower Pulley Reverse Disc Drive Belt Figure 7-3 6. Push the Wheels/Tines/PTO Drive Lever down into the FORWARD position. This increases the distance between the upper and lower pulleys. Next, lift and pull the entire belt out from between the pulleys. See Fig. 7-4. Figure 7-1 4. Push the belt upward to create slack in the belt. See Fig. 7-2. Push Belt Up Figure 7-2 38 Pulley Drive Belt Figure 7-4 7. Place the Wheels/Tines/PTO Drive Lever in FORWARD position. 8. Squeeze the belt in the middle and insert one end in between the pulleys. See Fig. 7-4.
-
 1
1 -
2
-
3
-
4
-
5
-
6
-
7
-
8
-
9
-
10
-
11
-
12
-
13
-
14
-
15
-
16
-
17
-
18
-
19
-
20
-
21
-
22
-
23
-
24
-
25
-
26
-
27
-
28
-
29
-
30
-
31
-
32
-
 33
33 -
 34
34 -
 35
35 -
 36
36 -
 37
37 -
 38
38 -
 39
39 -
 40
40 -
 41
41 -
 42
42 -
 43
43 -
44
 |
 |
