Uniden SDS100 Owner s Manual - Page 17

Data Naming, Priority Scanning

Page 17 highlights

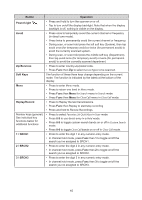
For information about what is included in each update, see: • http://info.uniden.com/UnidenMan4/SDS100FirmwareUpdates UPDATING THE DATABASE 1. To update the scanner's database, connect it to your PC using the supplied USB cable. Select Mass Storage. 2. Next, in Sentinel, select UPDATE/Update Master HPDB. This updates the database in Sentinel, but does not update the database in the scanner. 3. Finally, write the new database to your scanner by selecting Scanner/Write to Scanner. DATA NAMING Name any Favorites List, System, Site, Department, Channel, Location, Custom Search, Recording Session, Tone-Out, or SAME group using up to 64 characters. To Enter a Character, turn the scroll control until the character you want appears. To move the cursor to the right, press the right soft key (>). To move the cursor to the left, press the left soft key (

  • 1
  • 2
  • 3
  • 4
  • 5
  • 6
  • 7
  • 8
  • 9
  • 10
  • 11
  • 12
  • 13
  • 14
  • 15
  • 16
  • 17
  • 18
  • 19
  • 20
  • 21
  • 22
  • 23
  • 24
  • 25
  • 26
  • 27
  • 28
  • 29
  • 30
  • 31
  • 32
  • 33
  • 34
  • 35
  • 36
  • 37
  • 38
  • 39
  • 40
  • 41
  • 42
  • 43
  • 44
  • 45
  • 46
  • 47
  • 48
  • 49
  • 50
  • 51
  • 52
  • 53
  • 54
  • 55
  • 56
  • 57
  • 58
  • 59
  • 60
  • 61
  • 62

11
For information about what is included in each update, see:
UPDATING THE DATABASE
1.
To update the scanner’s database, connect it to your PC using the supplied USB cable.
Select Mass Storage.
2.
Next, in Sentinel, select
UPDATE/Update Master HPDB
. This updates the database in
Sentinel,
but does not update the database in the scanner
.
3.
Finally, write the new database to your scanner by selecting
Scanner/Write to Scanner
.
DATA NAMING
Name any Favorites List, System, Site, Department, Channel, Location, Custom Search,
Recording Session, Tone-Out, or SAME group using up to 64 characters.
To Enter a Character
, turn the scroll control until the character you want appears. To move the
cursor to the right, press the right soft key
(>)
.
To move the cursor to the left, press the left soft key
(<)
. To clear a character, press
./no
.
To clear all characters, press./no twice. Press
E/yes
when finished to exit.
PRIORITY SCANNING
Priority Scan
– When the scanner is scanning a Conventional System, it interrupts scanning,
based on the Priority Interval and Max Channels settings, to check priority channels for activity.
The more channels you have set to priority, the longer the interruption will be. The Favorites
List(s) and System(s) containing the priority channel(s) have to be enabled (and not Avoided) or
the scanner will display
Priority Scan No Channel
.
Priority DND
– The scanner checks priority channels, based on the Priority Interval and Max
Channels settings, only when not receiving other conventional channels so there is no interruption
in scanning with conventional systems.
Priority ID Scan
– This function is similar to conventional priority although there is no interruption
during the transmission. Priority is checked in between transmissions, when the scanner is
receiving the control channel, and during the channel delay period. The scanner can only look for
priority IDs in the trunked system it is currently scanning.
Preemptive Priority ID Scanning
– For Motorola systems that have channel priority active on the
system, if you flag a channel as priority and the system also has that TGID identified as a priority
channel, the scanner will preempt any current transmission if the TGID becomes active.
The highest priority is for channels in System Quick Key 0. The lowest priority is for channels in
System Quick Key 99. Priority for priority channels in the same channel Department follows the
order in which the channels were created.
To use Priority Scan
, you must first set your Priority Channels.
To use Priority ID Scan
, you must also enable Priority ID Scan for each system.
To toggle Priority Modes
, press
Func
then
./no(Pri)
.
Priority is always on for a trunked system, if enabled in the system.