Uniden SDS100 Owner s Manual - Page 56
Removing The Micro Sd Card, Reformatting The Micro Sd Card, Type Ii Special Status Bits
 |
View all Uniden SDS100 manuals
Add to My Manuals
Save this manual to your list of manuals |
Page 56 highlights
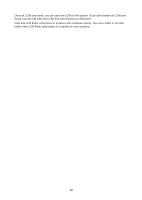
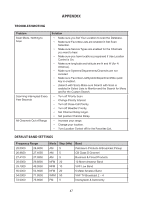
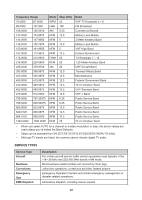
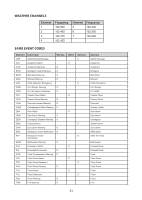
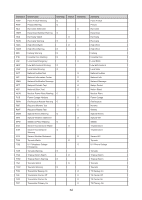
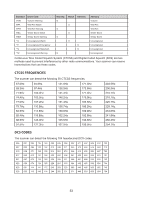
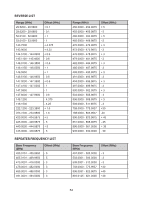
REMOVING THE MICRO SD CARD Carefully remove the SD Card by removing the back cover, then removing the battery pack. Slightly press down and slide the SD card holder right, then lift out the card. Gently install the SD Card the same way it was removed. REFORMATTING THE MICRO SD CARD SD cards should only be formatted using the special SD Card Formatter (https://www.sdcard.org/ downloads/formatter_4/). Then, you need to "Clear User Data" using Sentinel to restore all files and directories to the card. After formatting, the scanner won't be automatically detected (since it is wiped clean), so you may need to uncheck "Hide empty drives" in Windows Tools>Folder Options>View before doing the "Clear User Data" step. TYPE II SPECIAL STATUS BITS Type II Motorola Smartnet systems use these status bits for special transmissions such as emergency, patches, DES/DVP scrambled transmissions, and multiselects. Motorola trunking radios directly interpret them for their special functions, thus no difference is noticed by the person with the radio. The scanner however interprets these special talk group status bits as different talk groups entirely. Below is the conversion chart for these special status bits. TT ID + # Usage ID+0 Normal Talk group TT ID + # Usage ID+8 DES/DVP Encryption talk group ID+1 All Talk group ID+2 Emergency ID+3 Talk group patch to another ID+4 Emergency Patch ID+5 Emergency multi-group ID+6 unassigned ID+7 Multi-select (initiated by dispatcher) ID+9 DES All Talk group ID+10 DES Emergency ID+11 DES Talk group patch ID+12 DES Emergency Patch ID+13 DES Emergency multi-group ID+14 unassigned ID+15 Multi-select DES TG Therefore, if a user was transmitting a multi-select call on talk group 1808, the scanner would actually receive those transmissions on 1815. Some common uses of these status bits are as follows: • When a user hits their emergency button, all conversations on the talk group revert to the emergency status talk group (ID+2) until the dispatch clears the emergency status. Therefore, if someone hit their emergency button and their radio was on talk group 16, all communications would switch to talk group 18. • A lot of Fire and EMS departments dispatch tone-outs and alarms as Multi-select communications (ID+7). Therefore, if your fire department dispatch talk group is 1616, and they do dispatch tone-outs and alarms as Multi-selects, then those communications will be on talk group 1623. 50
-
 1
1 -
2
-
3
-
4
-
5
-
6
-
7
-
8
-
9
-
10
-
11
-
12
-
13
-
14
-
15
-
16
-
17
-
18
-
19
-
20
-
21
-
22
-
23
-
24
-
25
-
26
-
27
-
28
-
29
-
30
-
31
-
32
-
33
-
34
-
35
-
36
-
37
-
38
-
39
-
40
-
41
-
42
-
43
-
44
-
45
-
46
-
47
-
48
-
49
-
50
-
 51
51 -
 52
52 -
 53
53 -
 54
54 -
 55
55 -
 56
56 -
 57
57 -
 58
58 -
 59
59 -
 60
60 -
 61
61 -
62
 |
 |