Uniden SDS100 Owner s Manual - Page 20
Setting Up Your Scanner
 |
View all Uniden SDS100 manuals
Add to My Manuals
Save this manual to your list of manuals |
Page 20 highlights
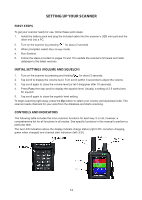
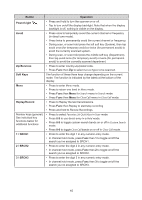
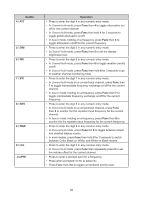
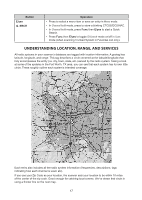
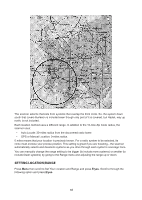
SETTING UP YOUR SCANNER FIRST STEPS To get your scanner ready for use, follow these quick steps: 1. Install the battery pack and plug the included cable into the scanner's USB mini port and the other end into a PC. 2. Turn on the scanner by pressing for about 2 seconds. 3. When prompted, select Mass Storage mode. 4. Run Sentinel. 5. Follow the steps provided on pages 10 and 11to update the scanner's firmware and radio database to the latest versions. INITIAL SETTINGS (VOLUME AND SQUELCH) 1. Turn on the scanner by pressing and holding for about 2 seconds. 2. Tap scroll to display the volume level. Turn scroll (within 3 seconds) to adjust the volume. 3. Tap scroll again to close the volume level (or let it disappear after 10 seconds). 4. Press Func then tap scroll to display the squelch level. Usually, a setting of 2-5 works best for squelch 5. Tap scroll again to close the squelch level setting. To begin scanning right away, press the Zip button to select your country and zip/postal code. The scanner loads channels for your area from the database and starts scanning. CONTROLS AND INDICATORS The following table includes the most common functions for each key. It is not, however, a comprehensive list for all functions in all modes. See specific functions in this manual to perform a particular task. The two LED indicators above the display indicate charge status (right LED; red when charging, green when charged) and channel alert indication (left LED). 14
-
 1
1 -
2
-
3
-
4
-
5
-
6
-
7
-
8
-
9
-
10
-
11
-
12
-
13
-
14
-
 15
15 -
 16
16 -
 17
17 -
 18
18 -
 19
19 -
 20
20 -
 21
21 -
 22
22 -
 23
23 -
 24
24 -
 25
25 -
26
-
27
-
28
-
29
-
30
-
31
-
32
-
33
-
34
-
35
-
36
-
37
-
38
-
39
-
40
-
41
-
42
-
43
-
44
-
45
-
46
-
47
-
48
-
49
-
50
-
51
-
52
-
53
-
54
-
55
-
56
-
57
-
58
-
59
-
60
-
61
-
62
 |
 |