Viper 5904 Owner Manual - Page 32
Sensor Adjust - shock sensor adjustment
 |
View all Viper 5904 manuals
Add to My Manuals
Save this manual to your list of manuals |
Page 32 highlights
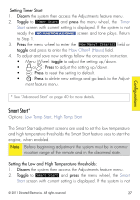
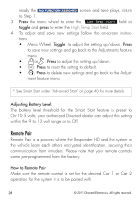
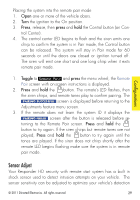
Configurations Placing the system into the remote pair mode 1. Open one or more of the vehicle doors. 2. Turn the ignition to the On position. 3. Press, release, then press and hold the Control button (on Con- trol Center). 4. The control center LED begins to flash and the siren emits one chirp to confirm the system is in Pair mode, the Control button can be released. The system will stay in Pair mode for 60 seconds or until the doors are closed or ignition turned off. The siren will emit one short and one long chirp when it exits remote pair mode. 1. Toggle to Remote Pair and press the menu wheel, the Remote Pair screen with on-screen instructions is displayed. 2. Press and hold the button. The remote's LED flashes, then the siren chirps, and remote tones play to confirm pairing. The PAIRING SUCCESSFUL screen is displayed before returning to the Adjustments feature menu screen. 3. If the remote does not learn the system ID it displays the PAIRING FAILED screen after the button is released before returning to the Remote Pair screen. Press and hold the button to try again. If the siren chirps but remote tones are not played, Press and hold the button to try again until the tones are played. If the siren does not chirp shortly after the remote LED begins flashing make sure the system is in remote pair mode. Sensor Adjust Your Responder HD security with remote start system has a built in shock sensor used to detect intrusion attempts on your vehicle. The sensor sensitivity can be adjusted to optimize your vehicle's detection © 2011 Directed Electronics. All rights reserved. 29
-
 1
1 -
2
-
3
-
4
-
5
-
6
-
7
-
8
-
9
-
10
-
11
-
12
-
13
-
14
-
15
-
16
-
17
-
18
-
19
-
20
-
21
-
22
-
23
-
24
-
25
-
26
-
 27
27 -
 28
28 -
 29
29 -
 30
30 -
 31
31 -
 32
32 -
 33
33 -
 34
34 -
 35
35 -
 36
36 -
 37
37 -
38
-
39
-
40
-
41
-
42
-
43
-
44
-
45
-
46
-
47
-
48
-
49
-
50
-
51
-
52
-
53
-
54
-
55
-
56
-
57
-
58
-
59
-
60
-
61
-
62
-
63
-
64
-
65
-
66
-
67
-
68
-
69
 |
 |