Weider 9000 Uk Manual - Page 6
Attach the Foot Plate 9 and the Rear Upright 6
 |
View all Weider 9000 manuals
Add to My Manuals
Save this manual to your list of manuals |
Page 6 highlights
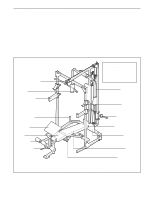
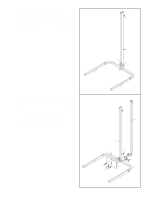
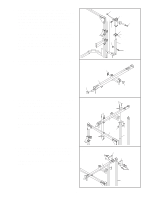
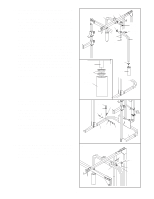
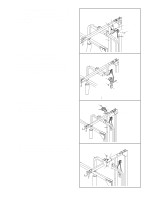
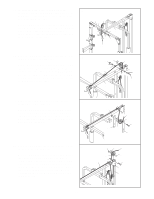
2. Slide the Centre Upright (5) onto the M10 x 2 60mm Carriage Bolts (50) in the Right and Left Bases (1, 2). Make sure that the Centre Upright is turned so the indicated bracket is on the side shown. Hand tighten two M10 Nylon Locknuts (49) onto the Bolts. Do not tighten the Nylon Locknuts yet. Bracket 5 49 49 50 1 3. Attach the Foot Plate (9) and the Rear Upright (6) 3 to the Right and Left Bases (1, 2) with two M10 x 68mm Bolts (46) and two M10 Nylon Locknuts (49). Attach the Foot Plate (9) to the Centre Upright (5) with an M10 x 68mm Bolt (46), an M10 Washer (52), and an M10 Nylon Locknut (49). Do not tighten the M10 Nylon Locknuts (49) yet. 2 6 5 1 52 49 46 46 49 9 2 6
-
 1
1 -
 2
2 -
 3
3 -
 4
4 -
 5
5 -
 6
6 -
 7
7 -
 8
8 -
 9
9 -
 10
10 -
 11
11 -
 12
12 -
13
-
14
-
15
-
16
-
17
-
18
-
19
-
20
-
21
-
22
-
23
-
24
-
25
-
26
-
27
-
28
 |
 |

6
3.
Attach the Foot Plate (9) and the Rear Upright (6)
to the Right and Left Bases (1, 2) with two M10 x
68mm Bolts (46) and two M10 Nylon Locknuts
(49).
Attach the Foot Plate (9) to the Centre Upright (5)
with an M10 x 68mm Bolt (46), an M10 Washer
(52), and an M10 Nylon Locknut (49).
Do not tighten the M10 Nylon Locknuts (49)
yet.
2.
Slide the Centre Upright (5) onto the M10 x
60mm Carriage Bolts (50) in the Right and Left
Bases (1, 2).
Make sure that the Centre Upright
is turned so the indicated bracket is on the
side shown.
Hand tighten two M10 Nylon
Locknuts (49) onto the Bolts.
Do not tighten the
Nylon Locknuts yet.
2
2
6
1
50
49
49
49
52
9
2
5
1
49
46
46
5
Bracket
3