Whirlpool ECKMF94 Installation Guide - Page 18
Installing, the shut-off, valve
 |
UPC - 050946418711
View all Whirlpool ECKMF94 manuals
Add to My Manuals
Save this manual to your list of manuals |
Page 18 highlights
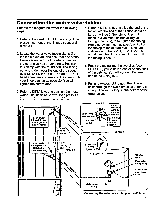
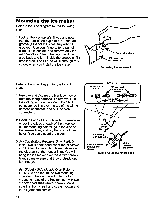
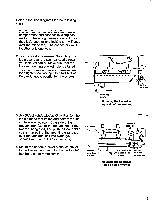
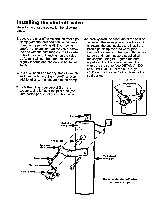
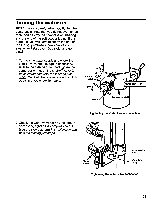
Installing the shut-off valve Refer to the diagram below for the following steps. 1. Locate the shut-off valve and the front pipe clamp (with the threaded hole in the center) from the copper tubing kit. Then, being careful not to crossthread the valve, screw the end with the pilot tube into the threaded hole of the clamp. Hand-tighten the valve as far as it will go (the threaded shaft is slightly tapered and can only be tightened so far). 2. Use a %*open-end (or adjustable) wrench, and turn the body of the shut-off valve an additional l/e-turn to secure it to the clamp. 3. Slide the rubber seal gasket (from the copper tubing kit) over the pilot tube (the unthreaded portion) of the shut-off valve. 4. Carefully slide the pilot tube of the shut-off valve into the water pipe access hole so it is against the seal gasket, and install the back pipe clamp over the water pipe. Secure the clamps to the pipe with the two screws and nuts that were supplied with the copper tubing kit. Tighten the nuts equally so that the space between the clamps is the same (see DETAIL A). DO NOT OVERTIGHTEN the nuts, or you could deform the clamps and damage the seal gasket. DETAIL A - f- I . Nut - Scrw + Pilot tube - 6 Shutoff valve T6 LJ Mounting the shut-off valve to the water pipe
-
 1
1 -
2
-
3
-
4
-
5
-
6
-
7
-
8
-
9
-
10
-
11
-
12
-
 13
13 -
 14
14 -
 15
15 -
 16
16 -
 17
17 -
 18
18 -
 19
19 -
 20
20 -
 21
21 -
 22
22 -
 23
23 -
24
-
25
-
26
-
27
-
28
 |
 |
