Whirlpool ECKMF94 Installation Guide - Page 20
Connecting, the copper, tubing, to the water, valve
 |
UPC - 050946418711
View all Whirlpool ECKMF94 manuals
Add to My Manuals
Save this manual to your list of manuals |
Page 20 highlights
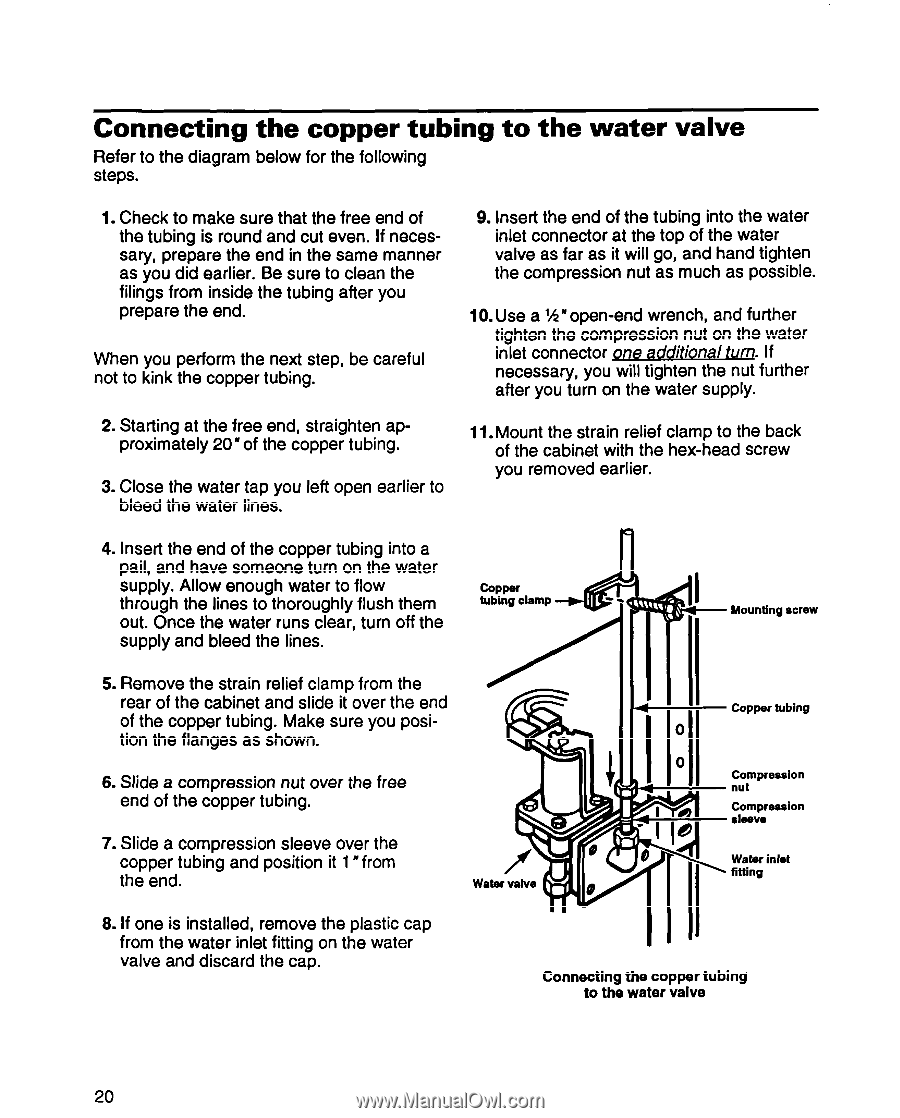
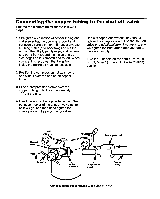
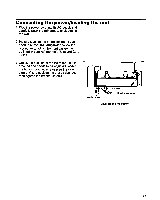
Connecting the copper tubing Refer to the diagram below for the following steps. to the water valve 1. Check to make sure that the free end of the tubing is round and cut even. If necessary, prepare the end in the same manner as you did earlier. Be sure to clean the filings from inside the tubing after you prepare the end. When you perform the next step, be careful not to kink the copper tubing. 2. Starting at the free end, straighten approximately 20" of the copper tubing. 3. Close the water tap you left open earlier to bleed the water lines. 9. Insert the end of the tubing into the water inlet connector at the top of the water valve as far as it will go, and hand tighten the compression nut as much as possible. 10. Use a % * open-end wrench, and further tighten the compression nut on the water inlet connector gne additional turq. If necessary, you will tighten the nut further after you turn on the water supply. 11. Mount the strain relief clamp to the back of the cabinet with the hex-head screw you removed earlier. 4. Insert the end of the copper tubing into a pail, and have someone turn on the water supply. Allow enough water to flow through the lines to thoroughly flush them out. Once the water runs clear, turn off the supply and bleed the lines. Mounting screw 5. Remove the strain relief clamp from the rear of the cabinet and slide it over the end of the copper tubing. Make sure you position the flanges as shown. 6. Slide a compression nut over the free end of the copper tubing. Copper tubing Compression nut 7. Slide a compression sleeve over the copper tubing and position it 1 "from the end. Watec inlet fitting 8. If one is installed, remove the plastic cap from the water inlet fitting on the water valve and discard the cap. Connecting the copper tubing to the water valve 20
-
 1
1 -
2
-
3
-
4
-
5
-
6
-
7
-
8
-
9
-
10
-
11
-
12
-
13
-
14
-
 15
15 -
 16
16 -
 17
17 -
 18
18 -
 19
19 -
 20
20 -
 21
21 -
 22
22 -
 23
23 -
 24
24 -
 25
25 -
26
-
27
-
28
 |
 |